Merchfox News

DTG Printing: Your 2026 Quick Guide to Direct-to-Garment Success (Master the Art & Business)

12 min read

The world of custom apparel is constantly evolving, vibrant, and ripe with opportunity. In 2026, one method continues to stand out for its versatility and quality: Direct-to-Garment (DTG) printing. Whether you're a budding entrepreneur looking to launch a print-on-demand store or a seasoned veteran aiming to refine your production, understanding DTG is essential. This isn't just a technical overview; it's a people-first guide designed to empower you with the knowledge needed to thrive. Here, we'll dive deep into DTG printing, exploring its core principles, comparing it with other popular methods, and sharing practical insights updated for 2026. This comprehensive guide, informed by the extensive experience of MerchFox, will help you master the art and business of direct-to-garment printing, ensuring your designs leap from screen to fabric with unparalleled quality.

DTG Printing: Your 2026 Quick Guide to Direct-to-Garment Success (Master the Art & Business)

1. What is DTG Printing? 

What is DTG Printing?

1.1. Direct-to-Garment Explained

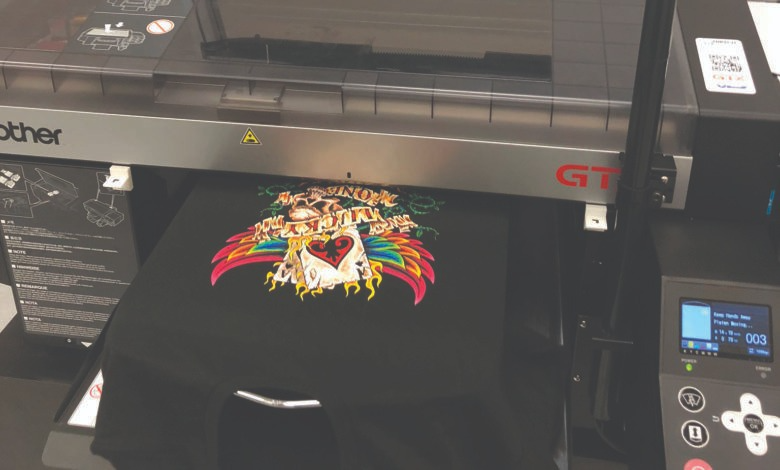
At its core, DTG printing is much like using a large inkjet printer for fabric. Instead of paper, the machine prints directly onto garments, most commonly t-shirts, hoodies, and tote bags. Utilizing specialized water-based inks, the DTG process allows for incredibly detailed, full-color designs to be applied with precision. It’s a digital process, meaning your design goes straight from your computer to the printer, eliminating the need for screens or films.

  • How DTG Works (Step-by-Step simplified):

    1. Pre-treatment: The garment is sprayed with a special solution, especially for dark colors or for enhancing print vibrancy on lighter ones. This helps the white ink (if used) bind to the fabric and prevents CMYK inks from being absorbed too deeply.

    2. Printing: The treated garment is loaded onto a platen, and the DTG printer jets CMYK inks (and white ink if needed) directly onto the fabric, creating your design.

    3. Curing: The printed garment then goes into a heat press or conveyor dryer, where heat sets the inks, making them permanent and washable.

1.2. Key Innovations & Trends in DTG for 2026

The DTG landscape is always shifting, and 2026 brings exciting developments. We're seeing remarkable advancements in ink technology, with manufacturers focusing on more eco-friendlier, water-based inks that deliver even greater vibrancy and wash fastness. Print speeds are continually improving, thanks to more sophisticated printheads and efficient software, making production cycles faster. Automation is also playing a bigger role, from automated pre-treatment systems to integrated design software that streamlines the entire workflow. Furthermore, DTG is expanding its reach, becoming a cornerstone for personalized fashion, small batch brand launches, and quick-turnaround promotional items, highlighting its flexibility in various niches.

2. Why Choose DTG? Unpacking the Pros & Cons 

Why Choose DTG?
Why Choose DTG?

Choosing the right printing method is critical for any custom apparel venture. DTG printing, while powerful, comes with its own set of advantages and challenges.

2.1. The Bright Side: DTG Advantages in Detail

DTG stands out for several compelling reasons:

  • Vibrant, Full-Color Designs & Fine Details: Unlike screen printing which uses spot colors, DTG handles complex, photorealistic designs with unlimited color palettes and gradients effortlessly. The detail resolution is astounding, capturing intricate artwork with precision.

  • Soft Hand Feel: Because DTG inks penetrate the fabric fibers rather than sitting on top, the finished print boasts an incredibly soft, breathable feel. This enhances garment comfort and consumer satisfaction.

  • Ideal for Small Batches & On-Demand Printing: DTG printing shines for one-off custom shirts or small runs. There are no setup fees per color, making it incredibly cost-effective for personalization and businesses operating on a print-on-demand model with low Minimum Order Quantities (MOQs).

  • Quick Setup & Turnaround: Digital files are directly sent to the printer, significantly reducing preparation time compared to traditional methods like screen printing. This means faster order fulfillment, a huge plus for customer satisfaction in 2026's fast-paced market.

  • Eco-Friendly Ink Options: Most DTG printers now use water-based inks which are biodegradable, non-toxic, and safer for the environment, aligning with growing consumer demand for sustainable practices.

2.2. The Challenges: DTG Disadvantages to Consider

Despite its many benefits, direct-to-garment printing isn't without its drawbacks:

  • Fabric Limitations: DTG thrives on natural fibers, especially cotton. Garments with high cotton content (ideally 80-100%) yield the best results. Printing on synthetics like polyester can be challenging, often resulting in less vibrant prints or poor ink adhesion, though advancements are continually addressing this.

  • Cost Per Print: While setup costs are low, the actual cost per DTG print, particularly for designs requiring white ink on dark garments, can be higher than screen printing for very large quantities. Ink consumption and pre-treatment add to the per-unit expense.

  • Pre-treatment Requirement: For optimal wash fastness and vibrancy, particularly on dark shirts (which require white ink as a base), garments must be pre-treated. This adds an extra step to the production process and requires specialized equipment.

  • Maintenance & Upkeep: DTG printers demand regular and meticulous maintenance. Inkjet printheads can clog if not cleaned routinely, leading to costly repairs or replacements. Environmental factors like humidity and temperature also need to be controlled.

  • Durability & Washability: While good, the durability of DTG prints can be slightly less than screen printing or DTF if not cared for properly. Specific washing instructions (inside out, cold water, low heat dry) are crucial for longevity.

3. DTG vs. The Competition: Which Printing Method is Best for You in 2026?

DTG vs. The Competition: Which Printing Method is Best for You in 2026?

Understanding how DTG printing stacks up against other popular methods is crucial for making an informed decision. Each technique has its niche.

3.1. DTG vs. Screen Printing

  • When to choose DTG: Opt for direct-to-garment when you need complex designs, an extensive range of colors, small order quantities, or personalized items. The setup is fast, making it perfect for on-demand scenarios.

  • When to choose Screen Printing: Screen printing excels in bulk orders (typically 24+ items) with simpler designs and a limited number of colors. It's highly durable and often more cost-effective for large production runs, offering precise Pantone color matching.

3.2. DTG vs. DTF (Direct-to-Film) Printing

  • The Rising Contender: DTF printing has gained significant traction, especially in 2026. It involves printing a design onto a special film, then applying an adhesive powder, and finally heat-pressing it onto the garment.

  • When DTF might be better: DTF offers greater fabric versatility, working well on polyester, cotton, and blends, even in lower cotton percentages where DTG struggles. The feel can be slightly thicker than DTG, but durability is often excellent. For unique placements or hard-to-reach areas, DTF transfers can be advantageous.

3.3. DTG vs. Sublimation Printing

  • Key Differences: Sublimation inks turn into a gas when heated, permanently bonding with synthetic fibers. This method is limited to light-colored polyester garments or polyester-coated items (like mugs or phone cases).

  • When to choose Sublimation: Choose sublimation for all-over prints on light polyester performance wear, sportswear, or items where a "no-feel" print is desired, as the ink becomes part of the fabric itself.

3.4. DTG vs. Heat Transfer Vinyl (HTV)

  • For simpler, graphic designs: HTV involves cutting a design out of a colored vinyl sheet and heat-pressing it onto the garment. It's excellent for bold graphics, lettering, and numbers on small runs.

  • Durability, feel, and cost: HTV is durable but has a distinct "plastic-y" feel and can't achieve the intricate details or color blends of DTG. It's generally more cost-effective for very simple designs and smaller quantities than screen printing, but less versatile than DTG.

4. Getting Started with DTG: Practical Steps & Best Practices

Getting Started with DTG: Practical Steps & Best Practices

Executing a successful DTG print involves more than just pressing a button. From fabric choice to post-processing, every step contributes to the final quality.

4.1. Apparel Selection: The Right Fabrics for DTG Success

The foundation of a great DTG print is the garment itself. High-quality, tightly woven fabrics with a high cotton content are paramount. Aim for 80-100% cotton for the best vibrancy and washability. While some blends (like cotton-poly 50/50) can be printed, results may vary, often requiring more specialized pre-treatment or yielding a more faded look. Darker garment colors often necessitate a white ink underbase, impacting both feel and cost.

4.2. Designing for DTG: File Formats, Resolution & Color Management

Your design file is where the magic begins.

  • File Formats: PNG with a transparent background is universally recognized as king for DTG. This ensures your design prints cleanly without unwanted boxes.

  • Resolution: Always aim for 300 DPI (dots per inch) at the final print size. Low-resolution images will appear pixelated and unprofessional.

  • Color Modes: DTG printers operate in CMYK, but many design programs default to RGB. It's often best to design in RGB for maximum color vibrancy and let the printer's RIP software handle the conversion, though understanding color gamut limitations is key. Avoid trying to match specific spot colors like Pantone without expert guidance, as DTG recreates colors using CMYK ink blends.

  • Design Considerations: Keep the print area in mind for your chosen garment size. While DTG handles fine details, extremely small text or thin lines might struggle with washability. Gradients are beautifully rendered, but ensure smooth transitions in your artwork.

4.3. The Critical Role of Pre-treatment

Pre-treatment is not optional for dark garments and highly recommended for many light ones. It creates a chemical bonding layer for the white ink and helps CMYK inks adhere to fibers, preventing them from soaking in too much and appearing faded. Application methods range from manual spray guns to automated pre-treatment machines, ensuring an even coat is crucial. The garment must then be properly dried with a heat press before printing.

4.4. Curing & Post-Processing for Durability

After printing, the ink needs to be "cured" to set permanently. This is typically done with a heat press or a conveyor dryer. Precise temperature, time, and pressure settings are vital for proper ink adhesion and wash fastness. Inadequate curing will lead to prints that fade or crack after washing. Following curing, allowing the garment to cool and then gently stretching it can sometimes improve the feel.

4.5. Essential DTG Printer Maintenance Tips

As MerchFox often emphasizes, consistent maintenance is the backbone of reliable DTG printing. Skipping this step is a fast track to clogged printheads and expensive repairs. Daily cleaning routines, including wiping down wiper blades and capping stations, are non-negotiable. Weekly deep cleans and monthly flushing of lines can prevent stubborn clogs. Crucially, maintaining a stable environment with controlled humidity and temperature is paramount, as fluctuations can quickly dry out or thicken inks.

5. Investing in DTG: Printers, Supplies & Costs for 2026

Investing in DTG: Printers, Supplies & Costs for 2026

Considering a DTG printing business means understanding the investment. It’s more than just the printer; it’s about inks, supplies, and a clear grasp of profitability.

5.1. Types of DTG Printers: Entry-Level vs. Industrial

DTG printers vary widely in price and capability. Entry-level machines are perfect for startups or hobbyists, offering a lower initial investment but typically slower speeds and smaller print areas. Industrial-grade printers, conversely, offer high-speed, large-volume production, multiple platens, and advanced features, but come with a substantial price tag. When looking for a printer, consider print size, speed, ease of maintenance, and the manufacturer's reputation for support. The "best DTG printers 2026" will balance reliability with innovative features.

5.2. Ink & Consumables: A Breakdown of Recurring Costs

The initial printer purchase is just one part of the equation. Recurring costs include:

  • White ink vs. CMYK ink usage: White ink, used as a base layer on dark garments, is typically more expensive and consumed faster than CMYK inks.

  • Pre-treatment solution costs: This solution is essential and is a continuous expense.

  • Maintenance supplies: Cleaning solutions, swabs, and other consumables for daily upkeep add up. Understanding these costs is crucial for accurate pricing.

5.3. Understanding Profit Margins: Is DTG Profitable in 2026?

Yes, DTG printing remains highly profitable in 2026, especially for businesses catering to customization and small orders. Calculating your cost per print, including garment cost, ink, pre-treatment, and labor, is foundational. Pricing strategies should reflect the value of customization and quick turnaround. Targeting niches like personalized gifts, small business uniforms, or event apparel can lead to excellent profit margins and scaling opportunities. The direct-to-garment guide for success always emphasizes understanding your numbers.

6. DTG Printing FAQs (Frequently Asked Questions)

Here are some common questions about DTG printing that we frequently encounter:

6.1. How long does DTG printing last?

With proper care, a DTG print can last for 50+ washes or even longer. Durability is comparable to high-quality screen prints, though it's important to follow specific washing instructions.

6.2. Is DTG printing expensive to start?

The initial investment for a DTG printer can range from a few thousand dollars for entry-level models to tens of thousands for industrial ones. While it's a significant upfront cost, it's often more accessible than a full screen-printing setup, especially considering the lack of extensive setup fees per design.

6.3. Can you DTG print on dark shirts?

Absolutely! DTG printing excels on dark shirts. It requires a white ink underbase layer beneath the CMYK colors to ensure the design pops and remains vibrant, which also necessitates pre-treatment.

6.4. What is the minimum order for DTG?

One. That's one of DTG's biggest advantages. You can print a single custom shirt cost-effectively, making it perfect for personalized gifts, samples, or on-demand fulfillment without inventory.

6.5. What are the best care instructions for DTG garments?

To maximize print longevity, always wash DTG garments inside out in cold water. Use a mild detergent, avoid bleach and harsh chemicals, and tumble dry on low heat or hang dry. Do not iron directly on the print.

6.6. What's the latest in DTG tech for 2026?

Expect continued improvements in ink vibrancy, eco-friendliness, and fabric versatility. Faster print speeds, more integrated software solutions, and enhanced automation in pre-treatment and curing are key DTG trends.

Conclusion: Is DTG Printing Your Future in 2026?

DTG printing offers an incredible blend of design freedom, detail, and flexibility, making it an indispensable tool for custom apparel businesses in 2026. While it has specific requirements regarding fabric and maintenance, its ability to produce vibrant, soft-feel prints for small batches and personalized orders is unmatched. We’ve explored the ins and outs of direct-to-garment, from the DTG process and its pros and cons to crucial comparisons and practical setup advice. As MerchFox has consistently shown through years of experience, success in DTG hinges on understanding its nuances and applying best practices diligently. Evaluate DTG printing against your specific needs and goals – whether you’re a hobbyist or aiming for high-volume production, this quick guide to direct-to-garment in 2026 provides the foundation for informed decisions. Share your thoughts or questions in the comments below, and explore our other guides to elevate your custom apparel journey!

Written by

John Nguyen

Print-on-demand tips, seller guides, and product updates from the MerchFox editorial team.

View author profile →

Ready to scale your POD store?

Connect your shop and start selling with MerchFox fulfillment.

Get started free

Keep reading

Related articles

All articles →
How to Start a Stationery Business: Your Complete 2025 Guide to Success

How to Start a Stationery Business: Your Complete 2025 Guide to Success

Starting a stationery business has never been more accessible or profitable than it is today. With the global stationery market valued at over $150 billion and growing steadily, there's tremendous opportunity for entrepreneurs ready to dive into this creative industry. Whether you're passionate about custom stationery design or looking to build a sustainable passive income stream, this comprehensive guide will walk you through every step of launching your successful venture.

Read article
The Ultimate Step-by-Step Guide on How to Make Custom Bumper Stickers at Home

The Ultimate Step-by-Step Guide on How to Make Custom Bumper Stickers at Home

Learn how to make your own unique bumper stickers with our comprehensive guide! Discover multiple DIY methods, from printable vinyl to budget-friendly alternatives, plus design tips, durability secrets, and how to sell your creations.

Read article
The open road is a canvas, and what better way to express yourself, share a laugh, or promote a cause than with a custom bumper sticker? Far from just a decorative piece, a well-placed sticker on your vehicle transforms it into a mobile billboard for your personality or brand. The thought of creating your own might seem daunting, but it’s an incredibly rewarding and surprisingly straightforward DIY project. From personalizing your ride to crafting unique gifts, diving into the world of how to make your own bumper stickers opens up a realm of creative possibilities.  The beauty of DIY bumper stickers lies in their personalization and cost-effectiveness. You’re not limited by mass-produced designs, allowing you to create truly unique, eye-catching visuals. Plus, it's a fun hobby that can even blossom into a profitable side hustle. This comprehensive guide will cover everything you need to know, from multiple reliable methods and essential tools to clever design tips and advanced considerations for durability. Here at MerchFox, we’ve explored the ins and outs of custom creations, and we’re excited to share our insights to help you get started on your bumper sticker journey.  Before You Begin: Defining Your Bumper Sticker Project Before you gather your materials and fire up your design software, take a moment to clarify your project's scope. This initial planning stage is crucial for choosing the right method and materials for your homemade bumper stickers.  2.1. Purpose: Personal Expression, Gifts, Branding, or Resale? Are you looking to simply adorn your own car with a funny quote, create a thoughtful gift for a friend, or perhaps promote your small business? Maybe you're even exploring how to make your own bumper stickers with the intent to sell them. Your ultimate purpose will significantly influence your material choices and desired durability. For a personal touch, simple methods might suffice, but for branding or resale, professional-grade materials and longevity become paramount.  2.2. Durability Needs: Indoor vs. Outdoor, Temporary vs. Long-Lasting, Weather-Resistance. A sticker for an indoor laptop won't need the same robust protection as one exposed to sun, rain, and road grime. For truly outdoor-ready, waterproof bumper stickers, weather-resistance and UV protection are non-negotiable. Consider how long you want your sticker to last and under what conditions it will be displayed. This will guide your selection of laminates and printing materials.  2.3. Design Ideas: Brainstorming Themes, Messages, Visual Style. This is where your creativity truly comes alive! Think about what you want your custom bumper stickers to communicate. Will it be humorous, political, artistic, or informative? Sketch out some ideas, consider fonts, colors, and imagery. A strong initial design concept will streamline the entire process, ensuring your final product effectively conveys your message.  Essential Materials & Tools for Homemade Bumper Stickers Having the right arsenal of materials and tools is key to successful DIY bumper stickers. Fortunately, most items are readily available, often found at your local craft store or online.  3.1. Design Software/Tools Your design journey starts here.  Computer-based: For professional results, programs like Adobe Illustrator or Photoshop offer extensive control. However, user-friendly alternatives like Canva (which, as Royal Elements notes, is excellent for beginners) provide templates and easy-to-use interfaces. GIMP is a powerful free option for image manipulation. Hand-drawing: If you prefer a more artistic touch, good old-fashioned markers, pens, and paper can be used to create your design, which can then be scanned into your computer for printing. 3.2. Printing & Base Materials This is where your design comes to life on a physical surface.  Printable Vinyl: This is the gold standard for durable, printable vinyl bumper stickers. You can find white, clear, matte, or glossy options specifically designed for inkjet or laser printers. Brands like Royal Elements are popular choices among DIY enthusiasts. Regular Paper: For a super budget-friendly alternative, as seen in Instructables' "Nebsi Method," standard printer paper can be used, though it will require significant protection later. 3.3. Protection & Lamination Crucial for transforming printed designs into resilient homemade bumper stickers.  Self-adhesive Laminating Sheets: These are often the key to waterproofing and UV protection, particularly highlighted in both Instructables' and Royal Elements' methods. They come in various finishes (glossy, matte) and sizes. Clear spray sealant (alternative): While not as robust as laminating sheets, a clear acrylic spray can offer some protection against moisture and UV rays. 3.4. Cutting Tools To give your stickers their final shape.  Scissors or craft knife: For simple shapes or when you're just starting out, a good pair of sharp scissors or a craft knife with a cutting mat will do the trick. Cutting machine (Cricut, Silhouette): For precision, intricate designs, or if you plan to make many stickers, a cutting machine like a Cricut or Silhouette is an invaluable investment. 3.5. Application Aids For a smooth, professional finish.  Squeegee: Helps press out air bubbles during application. Rubbing alcohol: Essential for thoroughly cleaning the surface of your vehicle before applying the sticker, ensuring maximum adhesion. 4. Method 1: The Popular Printable Vinyl Bumper Sticker Guide This method, often employed by experienced DIYers and detailed in resources like Royal Elements and wikiHow, is considered the benchmark for creating high-quality, durable custom bumper stickers at home.  Method 1: The Popular Printable Vinyl Bumper Sticker Guide Method 1: The Popular Printable Vinyl Bumper Sticker Guide 4.1. Step 1: Design Your Masterpiece. Start by creating your artwork in your chosen design software. Focus on high-resolution graphics to ensure crisp lines and vibrant colors. Pay attention to the correct dimensions for your desired sticker size. If you’re incorporating text, ensure it’s legible even from a distance, choosing bold fonts and contrasting colors. MerchFox often advises using a CMYK color profile if your printer supports it, as it’s better for print accuracy than RGB.  4.2. Step 2: Print Your Design on Vinyl. Load your printable vinyl into your home printer (inkjet or laser, depending on your vinyl type). It's crucial to select the correct printer settings – typically "photo quality" or "glossy paper" – to ensure the ink adheres properly and colors are vibrant. Print a test sheet on regular paper first to check colors and layout. Once printed on vinyl, allow ample time for the ink to dry completely, usually several hours, to prevent smudging.  4.3. Step 3: Laminate for Ultimate Protection (Crucial for Durability). This is perhaps the most critical step for outdoor waterproof bumper stickers. Laminating protects your sticker from UV fading, water damage, and scratches. Carefully peel back a small corner of your self-adhesive laminating sheet and align it with your printed vinyl. Slowly and steadily press the laminate down, using a squeegee or even a credit card to smooth it out and push any air bubbles towards the edges. Take your time here – a smooth lamination is key to longevity.  4.4. Step 4: Cut Out Your Bumper Sticker. With your design now printed and protected, it’s time to cut it out. For simple shapes, sharp scissors or a craft knife can achieve a clean edge. If you’re using a cutting machine like a Cricut or Silhouette, follow your machine’s instructions for calibrating and cutting, which allows for incredibly precise and complex shapes.  4.5. Step 5: Prepare and Apply Your Sticker. Proper application ensures your sticker stays put. First, thoroughly clean the application surface on your vehicle with rubbing alcohol and let it dry completely. This removes any wax, dirt, or grease that could prevent adhesion. Slowly peel the backing off your bumper sticker. Position it carefully, then apply it from one side to the other, using a squeegee to press it down firmly and work out any remaining air bubbles. For best results, MerchFox recommends applying in moderate temperatures, avoiding extreme heat or cold.  5. Method 2: The Budget-Friendly "Nebsi Production Method" (Laminate & Paper) For those looking for a cost-effective alternative or a more temporary solution, the "Nebsi Production Method," popularized on Instructables, is an ingenious way to create homemade bumper stickers using regular paper and laminating sheets.  Method 2: The Budget-Friendly "Nebsi Production Method" (Laminate & Paper) Method 2: The Budget-Friendly "Nebsi Production Method" (Laminate & Paper) 5.1. Understanding the "Nebsi Method": This method cleverly uses the laminating sheet not just for protection but also to create a repositionable, adhesive layer. By laminating both the front and back of a regular paper print, you encapsulate the design and create a surface that can be adhered to a car and even repositioned with care. It's a fantastic entry point for how to make your own bumper stickers without investing in specialized vinyl.  5.2. Step 1: Design & Print on Regular Paper. Create your design as usual, but this time, print it onto high-quality regular printer paper. While regular paper won't offer the inherent durability of vinyl, focusing on the best possible print resolution will ensure your colors are vibrant and details are crisp.  5.3. Step 2: Apply Laminate to the Front. Carefully apply a self-adhesive laminating sheet to the front (design side) of your printed paper. This layer protects your design from moisture and wear, giving it a glossy or matte finish depending on your laminate choice. Ensure a smooth, bubble-free application, as this is the primary protective layer.  5.4. Step 3: Apply Laminate to the Back. This is the unique step for the "Nebsi Method." Apply a second laminating sheet to the back of your paper. This second layer, once trimmed with a slight border, creates a temporary, repositionable adhesive surface. When you’re ready to apply, you simply peel off a portion of the backing paper from this laminate.  5.5. Step 4: Trim and Finish. Once both sides are laminated, trim your sticker to the desired shape, leaving a small border of laminate around the design. This border helps seal the paper edges, further protecting it from moisture.  5.6. Benefits & Best Use Cases: The Nebsi Method is incredibly cost-effective, yields a nice glossy finish (if using glossy laminate), and offers easy repositioning, making it ideal for temporary messages or if you frequently change your mind. While not as durable as pure vinyl in extreme conditions, it’s a brilliant way to experiment with custom bumper stickers on a budget.  6. Method 3: Quick & Artistic Hand-Drawn Bumper Stickers For those who love a truly unique, artisanal touch, hand-drawn bumper stickers offer unparalleled originality. This method emphasizes creativity and individual flair over mass production.  Method 3: Quick & Artistic Hand-Drawn Bumper Stickers Method 3: Quick & Artistic Hand-Drawn Bumper Stickers 6.1. Materials: You'll need sturdy cardstock or heavy paper, waterproof markers or paints (like acrylics), and clear contact paper or a spray sealant for protection.  6.2. Process: First, draw or paint your design directly onto the cardstock. Once completely dry, apply clear contact paper smoothly over the entire design for basic waterproofing, or use several coats of a clear spray sealant. After the sealant dries, cut out your design. To apply, you can use double-sided outdoor adhesive tape or magnets for a removable option.  6.3. Best for: This method is perfect for truly unique, artistic, one-off designs or protest signs where the raw, handmade aesthetic adds to the message. While less durable than printed vinyl methods, the authenticity is undeniable.  7. Maximizing Durability and Longevity: Pro Tips for Your Bumper Stickers Creating homemade bumper stickers that last requires attention to detail, especially when aiming for outdoor durability.  Maximizing Durability and Longevity: Pro Tips for Your Bumper Stickers Maximizing Durability and Longevity: Pro Tips for Your Bumper Stickers 7.1. The Importance of Quality Lamination: As MerchFox often stresses, lamination is your first line of defense. A high-quality laminating sheet provides critical UV resistance (preventing fading), waterproofing (protecting against rain and washes), and scratch protection (guarding against minor abrasions). Don't skimp on this step for outdoor stickers.  7.2. Material Selection: Choosing weather-resistant printable vinyl, designed specifically for outdoor use, provides a superior base. These materials are formulated to withstand environmental stressors better than standard paper or indoor vinyls.  7.3. Proper Surface Preparation: The longevity of your sticker is directly tied to its adhesion. Always clean the application surface thoroughly with rubbing alcohol to remove any contaminants. A clean, dry surface ensures maximum stick and prevents premature peeling.  7.4. Handling & Storage: Before application, store your stickers flat in a cool, dry place away from direct sunlight. Improper handling, like bending or creasing, can compromise the adhesive or lamination, leading to issues later on.  8. From Hobby to Business: How to Make Bumper Stickers to Sell Turning your passion for custom bumper stickers into a profitable venture is entirely achievable. Many successful businesses started in a home workshop, as resources like wikiHow and Swagify highlight.  From Hobby to Business: How to Make Bumper Stickers to Sell From Hobby to Business: How to Make Bumper Stickers to Sell 8.1. Market Research: Identify trends, popular niches, and target audiences. What messages resonate? What visual styles are currently popular? Research what's selling well on platforms like Etsy or local craft markets.  8.2. Designing for Profit: To create marketable designs, focus on uniqueness, high-quality aesthetics, and broad appeal within your chosen niche. Think about witty phrases, compelling graphics, or designs that speak to specific interests.  8.3. Material & Production Costs: Accurately calculate all your expenses, including printable vinyl, laminating sheets, ink, cutting blades, and even packaging. Understanding these costs is crucial for setting profitable prices. For bulk production, a cutting machine becomes highly cost-effective.  8.4. Pricing Your Bumper Stickers: Consider your production costs, the perceived value of your design, and competitor pricing. Aim for a price that covers your expenses, provides a reasonable profit, and remains attractive to buyers.  8.5. Marketing & Sales Channels: Etsy, Shopify, and other e-commerce platforms are excellent for online sales. Don't overlook local markets, craft fairs, or even collaborating with local businesses. Social media, particularly Instagram and TikTok, are powerful tools for showcasing your designs and reaching potential customers.  8.6. Packaging & Shipping: Presenting a professional product enhances perceived value. Use sturdy envelopes or mailers, and consider adding a small branded insert. Research cost-effective and reliable shipping methods for your DIY bumper stickers.  9. Troubleshooting Common Bumper Sticker Issues Even with the best planning, sometimes things don't go perfectly. Knowing how to troubleshoot common problems can save your project.  Troubleshooting Common Bumper Sticker Issues  Fading colors or cracking: This usually indicates insufficient UV protection. Ensure you're using quality laminating sheets with UV inhibitors, or a clear spray sealant specifically designed for outdoor use. Bubbles or peeling during application: Often caused by improper surface cleaning or rushed application. Clean thoroughly, apply slowly with a squeegee from the center outwards, and work in moderate temperatures. Difficulty removing old stickers cleanly: For stubborn stickers, heat (from a hairdryer on a low setting) can soften the adhesive. Plastic scrapers and adhesive removers (like Goo Gone) can help with residue, but always test on an inconspicuous area first. Ink smudging or bleeding during printing: This is typically due to incorrect printer settings (e.g., wrong paper type selected) or not allowing enough drying time before handling or laminating. Ensure your printer settings match your vinyl type and be patient with drying. 10. Frequently Asked Questions (FAQs) About DIY Bumper Stickers Frequently Asked Questions (FAQs) About DIY Bumper Stickers  Q: How long do homemade bumper stickers typically last? A: The lifespan of homemade bumper stickers varies greatly depending on the method and materials used. High-quality printable vinyl with robust lamination can last 3-5 years outdoors. Budget-friendly paper methods might last a few months to a year, especially if exposed to harsh weather.  Q: Can I use a regular home printer (inkjet/laser)? A: Yes, absolutely! Both inkjet and laser printers can be used to print bumper stickers at home, provided you choose printable vinyl or paper specifically designed for your printer type. Always check the product description of your chosen material.  Q: Are all homemade bumper stickers waterproof? A: No, not inherently. To make waterproof bumper stickers, you must laminate them with self-adhesive sheets or use a waterproof clear spray sealant. The printable vinyl itself might be water-resistant, but the ink and paper (if used) need protection.  Q: What's the best way to remove an old bumper sticker without damaging my car? A: The safest method involves using heat (a hairdryer on low) to soften the adhesive, then gently peeling the sticker off. For stubborn residue, automotive adhesive removers or rubbing alcohol can be used, but always test on a hidden area first.  Q: Can I make transparent bumper stickers at home? A: Yes, you can! You'll need to purchase transparent or clear printable vinyl. The process is similar to white vinyl, but your design will need to account for the transparency of the background. Remember that light colors and whites won't show up well on a transparent sticker without a white underlayer.  11. Conclusion: Your Road to Custom Bumper Sticker Success Starts Now! Conclusion: Your Road to Custom Bumper Sticker Success Starts Now!  There you have it – a comprehensive guide to mastering how to make your own bumper stickers. From selecting your purpose and gathering materials to printing, laminating, and even selling your creations, the journey is both creative and rewarding. Whether you're aiming for personal expression, thoughtful gifts, or a new entrepreneurial venture, the tools and knowledge are now at your fingertips.  Don't be afraid to experiment with different designs, colors, and methods. Each attempt refines your skills and brings you closer to crafting that perfect sticker. As we at MerchFox have seen, the satisfaction of seeing your own custom bumper stickers on a car, a laptop, or even a water bottle is unmatched. So go ahead, unleash your creativity, and let your message hit the road!

The open road is a canvas, and what better way to express yourself, share a laugh, or promote a cause than with a custom bumper sticker? Far from just a decorative piece, a well-placed sticker on your vehicle transforms it into a mobile billboard for your personality or brand. The thought of creating your own might seem daunting, but it’s an incredibly rewarding and surprisingly straightforward DIY project. From personalizing your ride to crafting unique gifts, diving into the world of how to make your own bumper stickers opens up a realm of creative possibilities. The beauty of DIY bumper stickers lies in their personalization and cost-effectiveness. You’re not limited by mass-produced designs, allowing you to create truly unique, eye-catching visuals. Plus, it's a fun hobby that can even blossom into a profitable side hustle. This comprehensive guide will cover everything you need to know, from multiple reliable methods and essential tools to clever design tips and advanced considerations for durability. Here at MerchFox, we’ve explored the ins and outs of custom creations, and we’re excited to share our insights to help you get started on your bumper sticker journey. Before You Begin: Defining Your Bumper Sticker Project Before you gather your materials and fire up your design software, take a moment to clarify your project's scope. This initial planning stage is crucial for choosing the right method and materials for your homemade bumper stickers. 2.1. Purpose: Personal Expression, Gifts, Branding, or Resale? Are you looking to simply adorn your own car with a funny quote, create a thoughtful gift for a friend, or perhaps promote your small business? Maybe you're even exploring how to make your own bumper stickers with the intent to sell them. Your ultimate purpose will significantly influence your material choices and desired durability. For a personal touch, simple methods might suffice, but for branding or resale, professional-grade materials and longevity become paramount. 2.2. Durability Needs: Indoor vs. Outdoor, Temporary vs. Long-Lasting, Weather-Resistance. A sticker for an indoor laptop won't need the same robust protection as one exposed to sun, rain, and road grime. For truly outdoor-ready, waterproof bumper stickers, weather-resistance and UV protection are non-negotiable. Consider how long you want your sticker to last and under what conditions it will be displayed. This will guide your selection of laminates and printing materials. 2.3. Design Ideas: Brainstorming Themes, Messages, Visual Style. This is where your creativity truly comes alive! Think about what you want your custom bumper stickers to communicate. Will it be humorous, political, artistic, or informative? Sketch out some ideas, consider fonts, colors, and imagery. A strong initial design concept will streamline the entire process, ensuring your final product effectively conveys your message. Essential Materials & Tools for Homemade Bumper Stickers Having the right arsenal of materials and tools is key to successful DIY bumper stickers. Fortunately, most items are readily available, often found at your local craft store or online. 3.1. Design Software/Tools Your design journey starts here. Computer-based: For professional results, programs like Adobe Illustrator or Photoshop offer extensive control. However, user-friendly alternatives like Canva (which, as Royal Elements notes, is excellent for beginners) provide templates and easy-to-use interfaces. GIMP is a powerful free option for image manipulation. Hand-drawing: If you prefer a more artistic touch, good old-fashioned markers, pens, and paper can be used to create your design, which can then be scanned into your computer for printing. 3.2. Printing & Base Materials This is where your design comes to life on a physical surface. Printable Vinyl: This is the gold standard for durable, printable vinyl bumper stickers. You can find white, clear, matte, or glossy options specifically designed for inkjet or laser printers. Brands like Royal Elements are popular choices among DIY enthusiasts. Regular Paper: For a super budget-friendly alternative, as seen in Instructables' "Nebsi Method," standard printer paper can be used, though it will require significant protection later. 3.3. Protection & Lamination Crucial for transforming printed designs into resilient homemade bumper stickers. Self-adhesive Laminating Sheets: These are often the key to waterproofing and UV protection, particularly highlighted in both Instructables' and Royal Elements' methods. They come in various finishes (glossy, matte) and sizes. Clear spray sealant (alternative): While not as robust as laminating sheets, a clear acrylic spray can offer some protection against moisture and UV rays. 3.4. Cutting Tools To give your stickers their final shape. Scissors or craft knife: For simple shapes or when you're just starting out, a good pair of sharp scissors or a craft knife with a cutting mat will do the trick. Cutting machine (Cricut, Silhouette): For precision, intricate designs, or if you plan to make many stickers, a cutting machine like a Cricut or Silhouette is an invaluable investment. 3.5. Application Aids For a smooth, professional finish. Squeegee: Helps press out air bubbles during application. Rubbing alcohol: Essential for thoroughly cleaning the surface of your vehicle before applying the sticker, ensuring maximum adhesion. 4. Method 1: The Popular Printable Vinyl Bumper Sticker Guide This method, often employed by experienced DIYers and detailed in resources like Royal Elements and wikiHow, is considered the benchmark for creating high-quality, durable custom bumper stickers at home. Method 1: The Popular Printable Vinyl Bumper Sticker Guide Method 1: The Popular Printable Vinyl Bumper Sticker Guide 4.1. Step 1: Design Your Masterpiece. Start by creating your artwork in your chosen design software. Focus on high-resolution graphics to ensure crisp lines and vibrant colors. Pay attention to the correct dimensions for your desired sticker size. If you’re incorporating text, ensure it’s legible even from a distance, choosing bold fonts and contrasting colors. MerchFox often advises using a CMYK color profile if your printer supports it, as it’s better for print accuracy than RGB. 4.2. Step 2: Print Your Design on Vinyl. Load your printable vinyl into your home printer (inkjet or laser, depending on your vinyl type). It's crucial to select the correct printer settings – typically "photo quality" or "glossy paper" – to ensure the ink adheres properly and colors are vibrant. Print a test sheet on regular paper first to check colors and layout. Once printed on vinyl, allow ample time for the ink to dry completely, usually several hours, to prevent smudging. 4.3. Step 3: Laminate for Ultimate Protection (Crucial for Durability). This is perhaps the most critical step for outdoor waterproof bumper stickers. Laminating protects your sticker from UV fading, water damage, and scratches. Carefully peel back a small corner of your self-adhesive laminating sheet and align it with your printed vinyl. Slowly and steadily press the laminate down, using a squeegee or even a credit card to smooth it out and push any air bubbles towards the edges. Take your time here – a smooth lamination is key to longevity. 4.4. Step 4: Cut Out Your Bumper Sticker. With your design now printed and protected, it’s time to cut it out. For simple shapes, sharp scissors or a craft knife can achieve a clean edge. If you’re using a cutting machine like a Cricut or Silhouette, follow your machine’s instructions for calibrating and cutting, which allows for incredibly precise and complex shapes. 4.5. Step 5: Prepare and Apply Your Sticker. Proper application ensures your sticker stays put. First, thoroughly clean the application surface on your vehicle with rubbing alcohol and let it dry completely. This removes any wax, dirt, or grease that could prevent adhesion. Slowly peel the backing off your bumper sticker. Position it carefully, then apply it from one side to the other, using a squeegee to press it down firmly and work out any remaining air bubbles. For best results, MerchFox recommends applying in moderate temperatures, avoiding extreme heat or cold. 5. Method 2: The Budget-Friendly "Nebsi Production Method" (Laminate & Paper) For those looking for a cost-effective alternative or a more temporary solution, the "Nebsi Production Method," popularized on Instructables, is an ingenious way to create homemade bumper stickers using regular paper and laminating sheets. Method 2: The Budget-Friendly "Nebsi Production Method" (Laminate & Paper) Method 2: The Budget-Friendly "Nebsi Production Method" (Laminate & Paper) 5.1. Understanding the "Nebsi Method": This method cleverly uses the laminating sheet not just for protection but also to create a repositionable, adhesive layer. By laminating both the front and back of a regular paper print, you encapsulate the design and create a surface that can be adhered to a car and even repositioned with care. It's a fantastic entry point for how to make your own bumper stickers without investing in specialized vinyl. 5.2. Step 1: Design & Print on Regular Paper. Create your design as usual, but this time, print it onto high-quality regular printer paper. While regular paper won't offer the inherent durability of vinyl, focusing on the best possible print resolution will ensure your colors are vibrant and details are crisp. 5.3. Step 2: Apply Laminate to the Front. Carefully apply a self-adhesive laminating sheet to the front (design side) of your printed paper. This layer protects your design from moisture and wear, giving it a glossy or matte finish depending on your laminate choice. Ensure a smooth, bubble-free application, as this is the primary protective layer. 5.4. Step 3: Apply Laminate to the Back. This is the unique step for the "Nebsi Method." Apply a second laminating sheet to the back of your paper. This second layer, once trimmed with a slight border, creates a temporary, repositionable adhesive surface. When you’re ready to apply, you simply peel off a portion of the backing paper from this laminate. 5.5. Step 4: Trim and Finish. Once both sides are laminated, trim your sticker to the desired shape, leaving a small border of laminate around the design. This border helps seal the paper edges, further protecting it from moisture. 5.6. Benefits & Best Use Cases: The Nebsi Method is incredibly cost-effective, yields a nice glossy finish (if using glossy laminate), and offers easy repositioning, making it ideal for temporary messages or if you frequently change your mind. While not as durable as pure vinyl in extreme conditions, it’s a brilliant way to experiment with custom bumper stickers on a budget. 6. Method 3: Quick & Artistic Hand-Drawn Bumper Stickers For those who love a truly unique, artisanal touch, hand-drawn bumper stickers offer unparalleled originality. This method emphasizes creativity and individual flair over mass production. Method 3: Quick & Artistic Hand-Drawn Bumper Stickers Method 3: Quick & Artistic Hand-Drawn Bumper Stickers 6.1. Materials: You'll need sturdy cardstock or heavy paper, waterproof markers or paints (like acrylics), and clear contact paper or a spray sealant for protection. 6.2. Process: First, draw or paint your design directly onto the cardstock. Once completely dry, apply clear contact paper smoothly over the entire design for basic waterproofing, or use several coats of a clear spray sealant. After the sealant dries, cut out your design. To apply, you can use double-sided outdoor adhesive tape or magnets for a removable option. 6.3. Best for: This method is perfect for truly unique, artistic, one-off designs or protest signs where the raw, handmade aesthetic adds to the message. While less durable than printed vinyl methods, the authenticity is undeniable. 7. Maximizing Durability and Longevity: Pro Tips for Your Bumper Stickers Creating homemade bumper stickers that last requires attention to detail, especially when aiming for outdoor durability. Maximizing Durability and Longevity: Pro Tips for Your Bumper Stickers Maximizing Durability and Longevity: Pro Tips for Your Bumper Stickers 7.1. The Importance of Quality Lamination: As MerchFox often stresses, lamination is your first line of defense. A high-quality laminating sheet provides critical UV resistance (preventing fading), waterproofing (protecting against rain and washes), and scratch protection (guarding against minor abrasions). Don't skimp on this step for outdoor stickers. 7.2. Material Selection: Choosing weather-resistant printable vinyl, designed specifically for outdoor use, provides a superior base. These materials are formulated to withstand environmental stressors better than standard paper or indoor vinyls. 7.3. Proper Surface Preparation: The longevity of your sticker is directly tied to its adhesion. Always clean the application surface thoroughly with rubbing alcohol to remove any contaminants. A clean, dry surface ensures maximum stick and prevents premature peeling. 7.4. Handling & Storage: Before application, store your stickers flat in a cool, dry place away from direct sunlight. Improper handling, like bending or creasing, can compromise the adhesive or lamination, leading to issues later on. 8. From Hobby to Business: How to Make Bumper Stickers to Sell Turning your passion for custom bumper stickers into a profitable venture is entirely achievable. Many successful businesses started in a home workshop, as resources like wikiHow and Swagify highlight. From Hobby to Business: How to Make Bumper Stickers to Sell From Hobby to Business: How to Make Bumper Stickers to Sell 8.1. Market Research: Identify trends, popular niches, and target audiences. What messages resonate? What visual styles are currently popular? Research what's selling well on platforms like Etsy or local craft markets. 8.2. Designing for Profit: To create marketable designs, focus on uniqueness, high-quality aesthetics, and broad appeal within your chosen niche. Think about witty phrases, compelling graphics, or designs that speak to specific interests. 8.3. Material & Production Costs: Accurately calculate all your expenses, including printable vinyl, laminating sheets, ink, cutting blades, and even packaging. Understanding these costs is crucial for setting profitable prices. For bulk production, a cutting machine becomes highly cost-effective. 8.4. Pricing Your Bumper Stickers: Consider your production costs, the perceived value of your design, and competitor pricing. Aim for a price that covers your expenses, provides a reasonable profit, and remains attractive to buyers. 8.5. Marketing & Sales Channels: Etsy, Shopify, and other e-commerce platforms are excellent for online sales. Don't overlook local markets, craft fairs, or even collaborating with local businesses. Social media, particularly Instagram and TikTok, are powerful tools for showcasing your designs and reaching potential customers. 8.6. Packaging & Shipping: Presenting a professional product enhances perceived value. Use sturdy envelopes or mailers, and consider adding a small branded insert. Research cost-effective and reliable shipping methods for your DIY bumper stickers. 9. Troubleshooting Common Bumper Sticker Issues Even with the best planning, sometimes things don't go perfectly. Knowing how to troubleshoot common problems can save your project. Troubleshooting Common Bumper Sticker Issues Fading colors or cracking: This usually indicates insufficient UV protection. Ensure you're using quality laminating sheets with UV inhibitors, or a clear spray sealant specifically designed for outdoor use. Bubbles or peeling during application: Often caused by improper surface cleaning or rushed application. Clean thoroughly, apply slowly with a squeegee from the center outwards, and work in moderate temperatures. Difficulty removing old stickers cleanly: For stubborn stickers, heat (from a hairdryer on a low setting) can soften the adhesive. Plastic scrapers and adhesive removers (like Goo Gone) can help with residue, but always test on an inconspicuous area first. Ink smudging or bleeding during printing: This is typically due to incorrect printer settings (e.g., wrong paper type selected) or not allowing enough drying time before handling or laminating. Ensure your printer settings match your vinyl type and be patient with drying. 10. Frequently Asked Questions (FAQs) About DIY Bumper Stickers Frequently Asked Questions (FAQs) About DIY Bumper Stickers Q: How long do homemade bumper stickers typically last? A: The lifespan of homemade bumper stickers varies greatly depending on the method and materials used. High-quality printable vinyl with robust lamination can last 3-5 years outdoors. Budget-friendly paper methods might last a few months to a year, especially if exposed to harsh weather. Q: Can I use a regular home printer (inkjet/laser)? A: Yes, absolutely! Both inkjet and laser printers can be used to print bumper stickers at home, provided you choose printable vinyl or paper specifically designed for your printer type. Always check the product description of your chosen material. Q: Are all homemade bumper stickers waterproof? A: No, not inherently. To make waterproof bumper stickers, you must laminate them with self-adhesive sheets or use a waterproof clear spray sealant. The printable vinyl itself might be water-resistant, but the ink and paper (if used) need protection. Q: What's the best way to remove an old bumper sticker without damaging my car? A: The safest method involves using heat (a hairdryer on low) to soften the adhesive, then gently peeling the sticker off. For stubborn residue, automotive adhesive removers or rubbing alcohol can be used, but always test on a hidden area first. Q: Can I make transparent bumper stickers at home? A: Yes, you can! You'll need to purchase transparent or clear printable vinyl. The process is similar to white vinyl, but your design will need to account for the transparency of the background. Remember that light colors and whites won't show up well on a transparent sticker without a white underlayer. 11. Conclusion: Your Road to Custom Bumper Sticker Success Starts Now! Conclusion: Your Road to Custom Bumper Sticker Success Starts Now! There you have it – a comprehensive guide to mastering how to make your own bumper stickers. From selecting your purpose and gathering materials to printing, laminating, and even selling your creations, the journey is both creative and rewarding. Whether you're aiming for personal expression, thoughtful gifts, or a new entrepreneurial venture, the tools and knowledge are now at your fingertips. Don't be afraid to experiment with different designs, colors, and methods. Each attempt refines your skills and brings you closer to crafting that perfect sticker. As we at MerchFox have seen, the satisfaction of seeing your own custom bumper stickers on a car, a laptop, or even a water bottle is unmatched. So go ahead, unleash your creativity, and let your message hit the road!

Have you ever designed something beautiful on your computer, only to have it come back from the printer looking completely different? It's a common, frustrating experience for many designers and businesses. The vibrant blues become dull purples, and bright greens turn muddy. This isn't a printer conspiracy; it's a fundamental misunderstanding of how colors translate between the digital and physical worlds. As MerchFox often shares from their extensive experience, this color discrepancy is almost always due to the difference between RGB and CMYK color systems.

Read article