Selling Guide

How to Sell Pin Buttons Through Print on Demand: Your Complete Guide to a Profitable Online Business

15 min read

Pin buttons have an undeniable charm. From rallying cries to quirky expressions, these small, versatile accessories have been making statements for decades. Today, the appeal of custom pin buttons is stronger than ever, offering a unique canvas for self-expression, branding, and niche communities. If you've ever dreamed of turning your creative ideas into tangible products without the usual headaches of inventory and shipping, then you're in the right place.

How to Sell Pin Buttons Through Print on Demand: Your Complete Guide to a Profitable Online Business

This guide reveals the exciting world of selling pin buttons online through Print on Demand (POD). Print on Demand revolutionizes how small businesses and individual creators launch products. It means you design, and your chosen POD partner handles the printing, packaging, and shipping directly to your customers. This low-risk, high-reward model is perfect for starting a pin button business from scratch. MerchFox, a recognized expert in e-commerce and Print on Demand, shares invaluable insights throughout this article to help you navigate every step. By the end of this comprehensive guide, you’ll understand exactly how to sell pin buttons through Print on Demand and build a profitable online venture.


I. Introduction: Unlock Your Creativity – The Appeal of Custom Pin Buttons & Print on Demand

Unlock Your Creativity – The Appeal of Custom Pin Buttons & Print on Demand

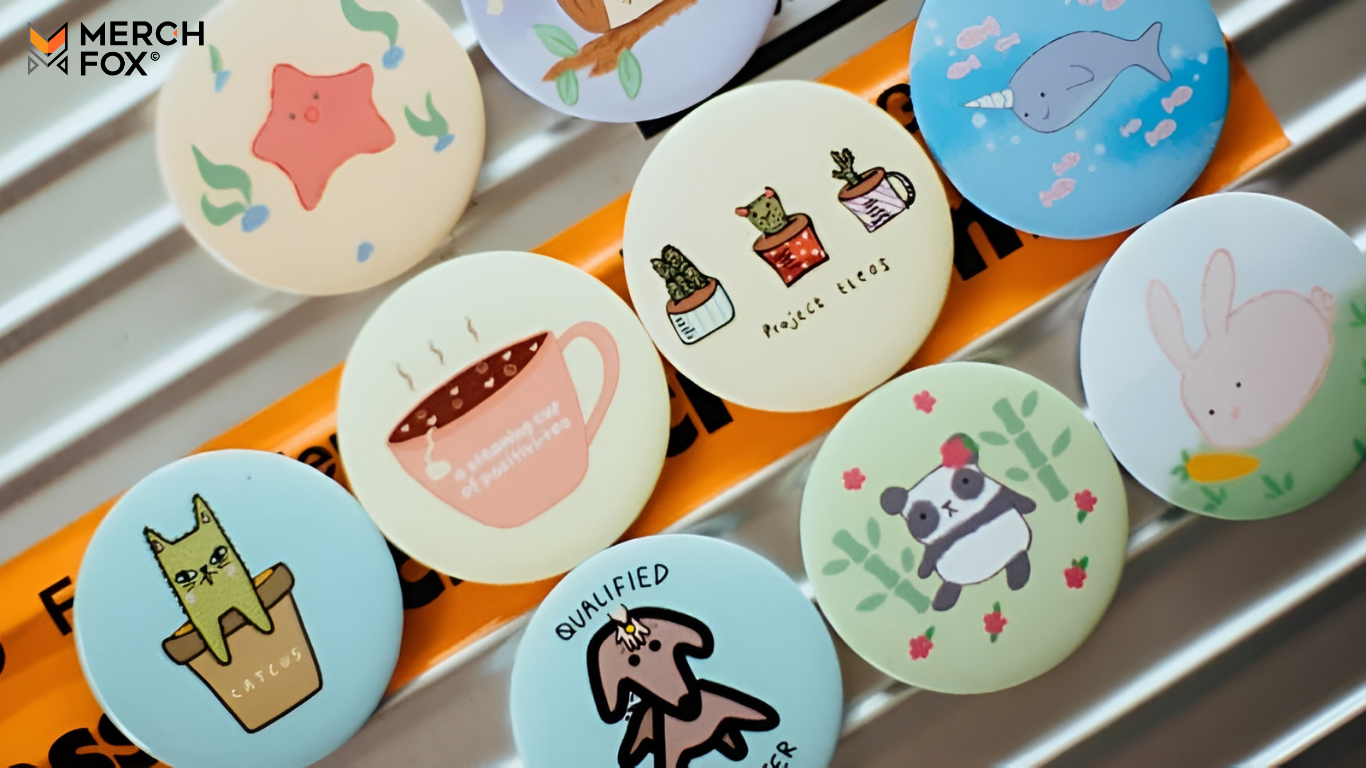
Pin buttons possess a timeless appeal, effortlessly blending into fashion, cultural movements, and personal branding. These tiny canvases pack a powerful punch, serving as everything from subtle fashion accents to bold political declarations and cherished merchandise for fans. Historically, pin buttons have been at the forefront of social commentary and fandom expression, a tradition that continues to thrive in our modern, digitally connected world. Their enduring relevance lies in their affordability, ease of customization, and universal appeal for sharing messages or showcasing personality.

The demand for unique, personalized items has never been higher, creating a significant opportunity for anyone with a creative spark to sell their own designs. But traditionally, starting a product business meant hefty upfront investments in inventory, warehousing, and complex logistics. This is where the magic of Print on Demand comes in. Print on Demand removes these barriers, allowing creators to focus purely on design and marketing. It's the ultimate solution for anyone looking to enter the market of selling print on demand pins without financial risk.

In this article, you'll discover a comprehensive, step-by-step roadmap to successfully selling custom pin buttons through Print on Demand. We'll cover everything from refining your initial ideas and designing compelling products to selecting the best POD partners, setting up your online store, and implementing effective marketing strategies. Get ready to transform your creative vision into a thriving online business.


II. Understanding the Pin Button Market & The POD Advantage

Understanding the Pin Button Market & The POD Advantage

Before diving into the mechanics, it’s crucial to grasp why pin buttons are a smart choice for a Print on Demand business and how POD uniquely positions you for success.

A. The Enduring Allure of Pin Buttons

Pin buttons remain incredibly popular for a multitude of reasons, making them a consistently viable product for online sales. They are highly affordable for both the seller and the buyer, encouraging impulse purchases and collectibility. People love them for personal expression, adorning backpacks, jackets, and hats, or using them to proudly display affiliations. For businesses and brands, they serve as excellent promotional tools.

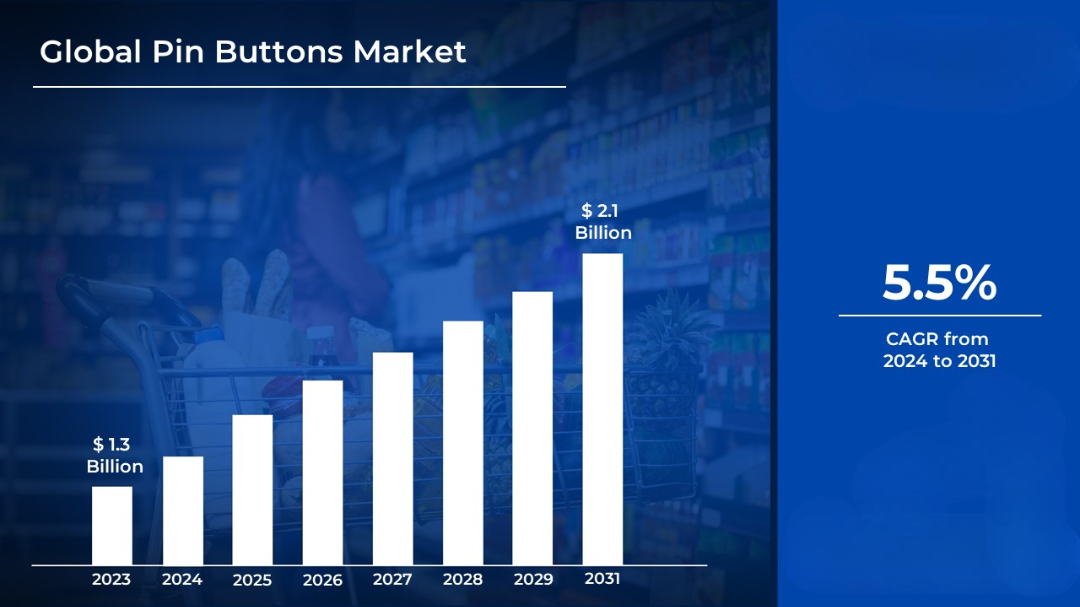
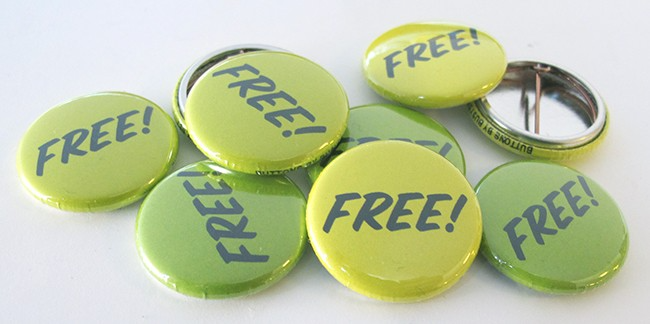
The market for pin buttons is remarkably diverse, catering to countless niches. Think about dedicated fandoms, individuals expressing political or social statements, those who appreciate humorous designs, unique artistic creations, or even promotional giveaways for events. The beauty of this market lies in its receptiveness to unique and niche designs, allowing you to carve out a specific audience. The more specialized and compelling your design pin buttons are, the better your chances of standing out.

B. Print on Demand Explained: Your Gateway to Selling Pin Buttons

So, what exactly is Print on Demand? In simple terms, POD is a business model where products are printed and shipped only after a customer places an order. You create the designs, upload them to a POD platform, and when a customer makes a purchase from your online store, the POD provider handles the manufacturing, packaging, and shipping directly to them. This hands-off approach makes selling pin buttons through Print on Demand incredibly appealing.

For anyone looking to launch a pin button business, the benefits of POD are transformative:

  • No Upfront Inventory Costs or Risks: You don't need to buy a bulk order of pins, which means no money tied up in stock and no risk of unsold inventory. This dramatically lowers the barrier to entry.

  • Wide Variety of Products: POD providers often offer different pin button sizes, finishes (matte, glossy), and even magnet options, allowing you to diversify your product line easily.

  • Focus on Design and Marketing, Not Logistics: Your primary role becomes creating captivating designs and getting them in front of your audience. All the back-end fulfillment is managed by your partner.

  • Scalability and Flexibility: Whether you sell one pin or a thousand, the POD system scales with your business. You can easily add new designs or remove underperforming ones without financial repercussions.


III. Your Step-by-Step Guide to Selling Custom Pin Buttons Online

Your Step-by-Step Guide to Selling Custom Pin Buttons Online

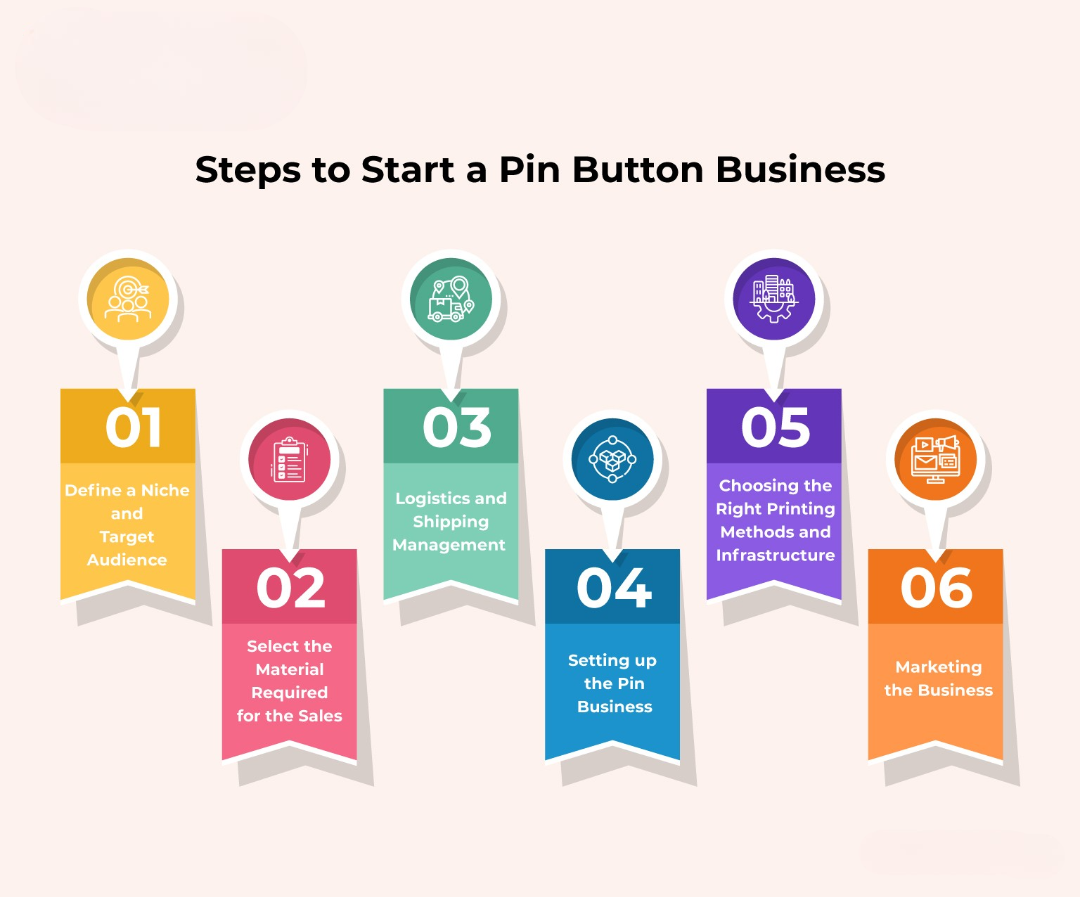
Ready to turn your pin button dreams into reality? Here's a practical, step-by-step guide to help you launch and grow your business.

A. Step 1: Ideation & Designing Your Pin Buttons for Success

The foundation of any successful pin button business is compelling design. This step is about sparking your creativity and laying the groundwork for products that resonate with your target audience.

First, finding your niche is paramount. Instead of trying to appeal to everyone, focus on a specific audience. Are you designing for cat lovers, retro gamers, advocates for a particular cause, or fans of a certain aesthetic? A well-defined niche makes your marketing efforts more effective and helps your designs stand out. MerchFox often advises that niching down initially can lead to greater long-term success, as it allows you to deeply understand your customer's desires.

Next, it's time for brainstorming design ideas. Keep an eye on current trends, but also consider evergreen themes, witty humor, or designs that reflect your unique personal brand. What messages do people want to wear? What makes them smile or feel seen?

When it comes to design principles for pin buttons, remember you're working with a small canvas. Simplicity and clarity are key. Your visuals should be impactful and any text legible, even at a glance. Understanding basic color psychology can also help evoke the right emotions. Bright, bold colors often work well for attention-grabbing designs.

For tools for graphic design, you have options at every skill level. Beginner-friendly platforms like Canva and Procreate (for iPad) make it easy to create professional-looking designs without extensive graphic design experience. For more seasoned designers, Adobe Illustrator or Photoshop offer powerful, industry-standard capabilities.

Finally, always pay attention to file requirements specified by your POD provider. This typically includes understanding resolution (usually 300 DPI for print), dimensions (e.g., 1.25", 2.25" circles), and color modes (CMYK is standard for print, though many POD services handle conversions from RGB). Getting these right ensures your final product looks exactly as you intended.

B. Step 2: Choosing the Right Print-on-Demand Partner for Pin Buttons

Selecting the right Print on Demand partner is a critical decision that impacts product quality, pricing, and overall customer satisfaction. Don't rush this step.

Consider these key selection criteria:

  • Product Quality: Not all pins are created equal. Look for providers that offer high-quality button types, precise printing, and durable construction. Check reviews and images from other sellers.

  • Pricing and Profit Margins: Compare the base cost of pins across providers. This directly affects your potential profit margins for pin buttons. Ensure their pricing allows you to set competitive retail prices while still making a healthy profit.

  • Integration with E-commerce Platforms: Does the provider seamlessly integrate with your chosen storefront (e.g., Etsy, Shopify)? Easy integration simplifies order fulfillment.

  • Shipping Options and Reliability: Evaluate their shipping costs, speeds, and international capabilities. Reliable shipping is vital for customer satisfaction.

  • Customer Support and Review Reputation: Good customer service from your POD partner can save you a lot of headaches down the line. Look for providers with strong positive reviews.

There are several popular POD providers that offer pin buttons, including major players like Printify and Printful, among others. Each has its pros and cons regarding product range, pricing, and integrations.

Crucially, always order samples of your pin designs before launching them to the public. This allows you to physically inspect the quality, color accuracy, and feel of the product, ensuring it meets your standards and those of your future customers. It's a small investment that prevents potential larger problems.

C. Step 3: Setting Up Your Online Storefront

Once your designs are ready and you've chosen a POD partner, it's time to build your virtual shop. Your online storefront is where customers will discover and purchase your custom pin buttons.

You have excellent e-commerce platform options available:

  • Etsy: Pros include a ready-made audience specifically looking for unique, handmade, and creative items. It's relatively easy to set up and manage, making Etsy pin buttons a popular starting point. Cons are higher competition in certain niches and various listing and transaction fees.

  • Shopify: Pros are complete control over your branding, design, and customer experience. It offers robust features and scalability for growth, making it ideal if you plan to expand beyond pins. Cons include a monthly subscription fee and the need to drive your own traffic, requiring more marketing effort.

  • Other platforms like WooCommerce (for WordPress users) or BigCommerce also offer viable solutions, each with its own advantages depending on your technical comfort and business goals.

After selecting your platform, the next step is connecting your POD provider. Most major POD services offer seamless integrations with popular e-commerce platforms, allowing orders to flow automatically from your shop to their fulfillment system. This automation is a key advantage of the Print on Demand model.

Finally, focus on creating compelling product listings. High-quality mockups and lifestyle photos of your pins are essential to catch a buyer's eye. Invest time in crafting descriptive titles and rich product descriptions that include relevant keywords, highlight the benefits of your designs, and clearly state sizes and materials. Setting up variants (e.g., single pins, 3-packs, different sizes) allows customers more choices.

D. Step 4: Pricing Your Pin Buttons for Profit & Competitiveness

Pricing is a delicate balance between profitability and market competitiveness. You want to make money, but you also want to attract buyers.

Start by calculating all your costs. This includes the POD base cost for each pin, any platform fees (e.g., Etsy listing fees, Shopify transaction fees), payment processing fees, and an allowance for marketing costs.

Next, conduct market research. Analyze what similar custom pin buttons are selling for on your chosen platform. Are you offering a premium product, or are you aiming for affordability?

Now you can determine your profit margins. Subtract your total costs from your desired selling price. Aim for realistic and sustainable margins that cover your time and effort. As an experienced seller, I often aim for at least a 50% gross margin on the product itself, before marketing spend.

Consider different pricing strategies: You might sell individual items, offer attractive bundles (e.g., a "fandom pack"), or run temporary discounts to drive sales. Experimentation is key to finding what works best for your audience.

E. Step 5: Marketing Your Custom Pin Buttons to Your Audience

Having great designs isn't enough; people need to know they exist. Effective marketing is how you drive traffic to your store and make sales.

Develop a strong social media strategy. Visual platforms like Instagram, TikTok, and Pinterest are perfect for showcasing your design pin buttons. Share high-quality photos, short videos of your pins in action, behind-the-scenes glimpses of your design process, and engaging content like polls or design contests. Encourage user-generated content by sharing customers' photos.

Implement Search Engine Optimization (SEO) for your shop. This means doing keyword research to find terms your target audience uses and incorporating them naturally into your product titles, descriptions, and shop sections. Optimize your shop's tags to improve visibility in internal search results on platforms like Etsy, or in Google search for Shopify stores. Learning how to sell pin buttons through Print on Demand effectively includes understanding how to be found.

Consider email marketing as you grow. Build an email list from your customers or website visitors to announce new arrivals, special promotions, or exclusive discounts.

Collaborations with other artists, small businesses, or influencers can also introduce your pins to new, relevant audiences. A shout-out from an influencer whose style aligns with your brand can generate significant interest.

Finally, paid advertising (optional) can accelerate growth. Platforms like Facebook/Instagram Ads or Google Shopping can target specific demographics with high precision. However, this often requires a budget and a clear understanding of your return on ad spend, so consider it once you have some organic sales data.


IV. Tips for Long-Term Success & Growing Your Pin Button Business

Tips for Long-Term Success & Growing Your Pin Button Business

Building a profitable Print on Demand pin button business is an ongoing journey. Here are strategies to ensure its long-term viability and growth.

A. Consistency in Quality and Branding

Maintaining consistency in quality and branding is paramount. Always ensure your designs are printed to a high standard and that your POD partner consistently delivers quality products. Beyond the physical product, develop a consistent brand voice and visual identity across all your platforms. This includes your logo, color palette, writing style, and the overall aesthetic of your shop and social media. A strong, consistent brand builds trust and recognition.

B. Continual Design Refresh & Trend Adaptation

The market is always evolving, and so should your product line. Stay updated with cultural trends, popular memes, and emerging niches. Regularly introduce new designs to keep your shop fresh and give existing customers a reason to return. Don't be afraid to experiment, but also pay attention to what your audience responds to most positively.

C. Exceptional Customer Service

In the competitive online marketplace, exceptional customer service can be your biggest differentiator. Be prompt and clear in your communication. Clearly outline your shop policies regarding returns, exchanges, and shipping times. When issues arise, handle them professionally and empathetically. Encourage reviews and feedback, as positive reviews build trust and social proof, while constructive feedback can help you improve.

D. Analyzing Sales Data

Smart business owners use data to drive decisions. Regularly analyze your sales data to understand which designs are best-sellers and which are underperformers. Look at your conversion rates, average order value, and customer demographics. Use this invaluable information to inform future design choices, refine your marketing strategies, and identify opportunities for product expansion. This analytical approach is key to understanding the true potential of how to sell pin buttons through Print on Demand.


V. Frequently Asked Questions (FAQs) About Selling Pin Buttons

Here are some common questions people ask when considering starting a Print on Demand pin button business.

  • Q: Do I need graphic design skills to sell custom pin buttons?

    • A: Not necessarily. While helpful, you can use beginner-friendly tools like Canva with pre-made templates, hire freelance designers, or even utilize AI art generation tools to create unique designs.

  • Q: How much profit can I make selling pin buttons?

    • A: Profitability varies greatly depending on your POD partner's base cost, your pricing strategy, and your sales volume. With strategic pricing and good marketing, achieving profit margins of 30-60% per pin (after POD costs) is certainly possible, allowing for healthy overall earnings.

  • Q: How long does it take to start selling pin buttons with Print on Demand?

    • A: The timeline can range from a few days to a few weeks. If you have designs ready and choose a POD platform with seamless integration, you could launch your shop very quickly. The main time investments are design creation and setting up your online store.

  • Q: Are pin buttons still popular, or is it a passing trend?

    • A: Pin buttons have enduring popularity. Their versatility, affordability, and ability to convey messages or personal style ensure they remain a consistent item in fashion, merchandise, and self-expression. They are not a passing trend.

  • Q: Can I sell pin buttons featuring copyrighted material?

    • A: Absolutely not. Strict adherence to intellectual property laws is crucial. You must only sell designs that you own or have explicit permission to use. Violating copyright can lead to legal action and account suspension.

  • Q: What are the best platforms for selling pin buttons?

    • A: Etsy is excellent for beginners due to its ready-made audience and focus on unique goods, making Etsy pin buttons a great entry point. Shopify offers more control and scalability for branding and long-term growth, though it requires more effort in driving traffic.


VI. Conclusion: Start Pinning Your Way to Profit Today!

Selling custom pin buttons through Print on Demand is an incredibly accessible and rewarding venture for creatives, entrepreneurs, and anyone looking to start an online business with minimal risk. It empowers you to transform your artistic ideas into tangible products that resonate with a global audience, all without the logistical headaches of traditional retail.

This complete guide has equipped you with the knowledge and steps to confidently embark on your journey. From understanding the market and refining your designs to choosing the right POD partner, setting up your shop, and marketing your unique creations, every aspect has been covered. As MerchFox has emphasized throughout, success hinges on a blend of creativity, consistent quality, strategic marketing, and a genuine customer-first approach.

The barriers to entry have never been lower. So, what are you waiting for? Take that first exciting step today. Start designing, explore the robust Print on Demand platforms available, and begin turning your imaginative ideas into a profitable online business. You now know how to sell pin buttons through Print on Demand – the path to profit is open!

Written by

John Nguyen

Print-on-demand tips, seller guides, and product updates from the MerchFox editorial team.

View author profile →

Ready to scale your POD store?

Connect your shop and start selling with MerchFox fulfillment.

Get started free

Keep reading

Related articles

All articles →
How to Start a Stationery Business: Your Complete 2025 Guide to Success

How to Start a Stationery Business: Your Complete 2025 Guide to Success

Starting a stationery business has never been more accessible or profitable than it is today. With the global stationery market valued at over $150 billion and growing steadily, there's tremendous opportunity for entrepreneurs ready to dive into this creative industry. Whether you're passionate about custom stationery design or looking to build a sustainable passive income stream, this comprehensive guide will walk you through every step of launching your successful venture.

Read article
The Ultimate Step-by-Step Guide on How to Make Custom Bumper Stickers at Home

The Ultimate Step-by-Step Guide on How to Make Custom Bumper Stickers at Home

Learn how to make your own unique bumper stickers with our comprehensive guide! Discover multiple DIY methods, from printable vinyl to budget-friendly alternatives, plus design tips, durability secrets, and how to sell your creations.

Read article
The open road is a canvas, and what better way to express yourself, share a laugh, or promote a cause than with a custom bumper sticker? Far from just a decorative piece, a well-placed sticker on your vehicle transforms it into a mobile billboard for your personality or brand. The thought of creating your own might seem daunting, but it’s an incredibly rewarding and surprisingly straightforward DIY project. From personalizing your ride to crafting unique gifts, diving into the world of how to make your own bumper stickers opens up a realm of creative possibilities.  The beauty of DIY bumper stickers lies in their personalization and cost-effectiveness. You’re not limited by mass-produced designs, allowing you to create truly unique, eye-catching visuals. Plus, it's a fun hobby that can even blossom into a profitable side hustle. This comprehensive guide will cover everything you need to know, from multiple reliable methods and essential tools to clever design tips and advanced considerations for durability. Here at MerchFox, we’ve explored the ins and outs of custom creations, and we’re excited to share our insights to help you get started on your bumper sticker journey.  Before You Begin: Defining Your Bumper Sticker Project Before you gather your materials and fire up your design software, take a moment to clarify your project's scope. This initial planning stage is crucial for choosing the right method and materials for your homemade bumper stickers.  2.1. Purpose: Personal Expression, Gifts, Branding, or Resale? Are you looking to simply adorn your own car with a funny quote, create a thoughtful gift for a friend, or perhaps promote your small business? Maybe you're even exploring how to make your own bumper stickers with the intent to sell them. Your ultimate purpose will significantly influence your material choices and desired durability. For a personal touch, simple methods might suffice, but for branding or resale, professional-grade materials and longevity become paramount.  2.2. Durability Needs: Indoor vs. Outdoor, Temporary vs. Long-Lasting, Weather-Resistance. A sticker for an indoor laptop won't need the same robust protection as one exposed to sun, rain, and road grime. For truly outdoor-ready, waterproof bumper stickers, weather-resistance and UV protection are non-negotiable. Consider how long you want your sticker to last and under what conditions it will be displayed. This will guide your selection of laminates and printing materials.  2.3. Design Ideas: Brainstorming Themes, Messages, Visual Style. This is where your creativity truly comes alive! Think about what you want your custom bumper stickers to communicate. Will it be humorous, political, artistic, or informative? Sketch out some ideas, consider fonts, colors, and imagery. A strong initial design concept will streamline the entire process, ensuring your final product effectively conveys your message.  Essential Materials & Tools for Homemade Bumper Stickers Having the right arsenal of materials and tools is key to successful DIY bumper stickers. Fortunately, most items are readily available, often found at your local craft store or online.  3.1. Design Software/Tools Your design journey starts here.  Computer-based: For professional results, programs like Adobe Illustrator or Photoshop offer extensive control. However, user-friendly alternatives like Canva (which, as Royal Elements notes, is excellent for beginners) provide templates and easy-to-use interfaces. GIMP is a powerful free option for image manipulation. Hand-drawing: If you prefer a more artistic touch, good old-fashioned markers, pens, and paper can be used to create your design, which can then be scanned into your computer for printing. 3.2. Printing & Base Materials This is where your design comes to life on a physical surface.  Printable Vinyl: This is the gold standard for durable, printable vinyl bumper stickers. You can find white, clear, matte, or glossy options specifically designed for inkjet or laser printers. Brands like Royal Elements are popular choices among DIY enthusiasts. Regular Paper: For a super budget-friendly alternative, as seen in Instructables' "Nebsi Method," standard printer paper can be used, though it will require significant protection later. 3.3. Protection & Lamination Crucial for transforming printed designs into resilient homemade bumper stickers.  Self-adhesive Laminating Sheets: These are often the key to waterproofing and UV protection, particularly highlighted in both Instructables' and Royal Elements' methods. They come in various finishes (glossy, matte) and sizes. Clear spray sealant (alternative): While not as robust as laminating sheets, a clear acrylic spray can offer some protection against moisture and UV rays. 3.4. Cutting Tools To give your stickers their final shape.  Scissors or craft knife: For simple shapes or when you're just starting out, a good pair of sharp scissors or a craft knife with a cutting mat will do the trick. Cutting machine (Cricut, Silhouette): For precision, intricate designs, or if you plan to make many stickers, a cutting machine like a Cricut or Silhouette is an invaluable investment. 3.5. Application Aids For a smooth, professional finish.  Squeegee: Helps press out air bubbles during application. Rubbing alcohol: Essential for thoroughly cleaning the surface of your vehicle before applying the sticker, ensuring maximum adhesion. 4. Method 1: The Popular Printable Vinyl Bumper Sticker Guide This method, often employed by experienced DIYers and detailed in resources like Royal Elements and wikiHow, is considered the benchmark for creating high-quality, durable custom bumper stickers at home.  Method 1: The Popular Printable Vinyl Bumper Sticker Guide Method 1: The Popular Printable Vinyl Bumper Sticker Guide 4.1. Step 1: Design Your Masterpiece. Start by creating your artwork in your chosen design software. Focus on high-resolution graphics to ensure crisp lines and vibrant colors. Pay attention to the correct dimensions for your desired sticker size. If you’re incorporating text, ensure it’s legible even from a distance, choosing bold fonts and contrasting colors. MerchFox often advises using a CMYK color profile if your printer supports it, as it’s better for print accuracy than RGB.  4.2. Step 2: Print Your Design on Vinyl. Load your printable vinyl into your home printer (inkjet or laser, depending on your vinyl type). It's crucial to select the correct printer settings – typically "photo quality" or "glossy paper" – to ensure the ink adheres properly and colors are vibrant. Print a test sheet on regular paper first to check colors and layout. Once printed on vinyl, allow ample time for the ink to dry completely, usually several hours, to prevent smudging.  4.3. Step 3: Laminate for Ultimate Protection (Crucial for Durability). This is perhaps the most critical step for outdoor waterproof bumper stickers. Laminating protects your sticker from UV fading, water damage, and scratches. Carefully peel back a small corner of your self-adhesive laminating sheet and align it with your printed vinyl. Slowly and steadily press the laminate down, using a squeegee or even a credit card to smooth it out and push any air bubbles towards the edges. Take your time here – a smooth lamination is key to longevity.  4.4. Step 4: Cut Out Your Bumper Sticker. With your design now printed and protected, it’s time to cut it out. For simple shapes, sharp scissors or a craft knife can achieve a clean edge. If you’re using a cutting machine like a Cricut or Silhouette, follow your machine’s instructions for calibrating and cutting, which allows for incredibly precise and complex shapes.  4.5. Step 5: Prepare and Apply Your Sticker. Proper application ensures your sticker stays put. First, thoroughly clean the application surface on your vehicle with rubbing alcohol and let it dry completely. This removes any wax, dirt, or grease that could prevent adhesion. Slowly peel the backing off your bumper sticker. Position it carefully, then apply it from one side to the other, using a squeegee to press it down firmly and work out any remaining air bubbles. For best results, MerchFox recommends applying in moderate temperatures, avoiding extreme heat or cold.  5. Method 2: The Budget-Friendly "Nebsi Production Method" (Laminate & Paper) For those looking for a cost-effective alternative or a more temporary solution, the "Nebsi Production Method," popularized on Instructables, is an ingenious way to create homemade bumper stickers using regular paper and laminating sheets.  Method 2: The Budget-Friendly "Nebsi Production Method" (Laminate & Paper) Method 2: The Budget-Friendly "Nebsi Production Method" (Laminate & Paper) 5.1. Understanding the "Nebsi Method": This method cleverly uses the laminating sheet not just for protection but also to create a repositionable, adhesive layer. By laminating both the front and back of a regular paper print, you encapsulate the design and create a surface that can be adhered to a car and even repositioned with care. It's a fantastic entry point for how to make your own bumper stickers without investing in specialized vinyl.  5.2. Step 1: Design & Print on Regular Paper. Create your design as usual, but this time, print it onto high-quality regular printer paper. While regular paper won't offer the inherent durability of vinyl, focusing on the best possible print resolution will ensure your colors are vibrant and details are crisp.  5.3. Step 2: Apply Laminate to the Front. Carefully apply a self-adhesive laminating sheet to the front (design side) of your printed paper. This layer protects your design from moisture and wear, giving it a glossy or matte finish depending on your laminate choice. Ensure a smooth, bubble-free application, as this is the primary protective layer.  5.4. Step 3: Apply Laminate to the Back. This is the unique step for the "Nebsi Method." Apply a second laminating sheet to the back of your paper. This second layer, once trimmed with a slight border, creates a temporary, repositionable adhesive surface. When you’re ready to apply, you simply peel off a portion of the backing paper from this laminate.  5.5. Step 4: Trim and Finish. Once both sides are laminated, trim your sticker to the desired shape, leaving a small border of laminate around the design. This border helps seal the paper edges, further protecting it from moisture.  5.6. Benefits & Best Use Cases: The Nebsi Method is incredibly cost-effective, yields a nice glossy finish (if using glossy laminate), and offers easy repositioning, making it ideal for temporary messages or if you frequently change your mind. While not as durable as pure vinyl in extreme conditions, it’s a brilliant way to experiment with custom bumper stickers on a budget.  6. Method 3: Quick & Artistic Hand-Drawn Bumper Stickers For those who love a truly unique, artisanal touch, hand-drawn bumper stickers offer unparalleled originality. This method emphasizes creativity and individual flair over mass production.  Method 3: Quick & Artistic Hand-Drawn Bumper Stickers Method 3: Quick & Artistic Hand-Drawn Bumper Stickers 6.1. Materials: You'll need sturdy cardstock or heavy paper, waterproof markers or paints (like acrylics), and clear contact paper or a spray sealant for protection.  6.2. Process: First, draw or paint your design directly onto the cardstock. Once completely dry, apply clear contact paper smoothly over the entire design for basic waterproofing, or use several coats of a clear spray sealant. After the sealant dries, cut out your design. To apply, you can use double-sided outdoor adhesive tape or magnets for a removable option.  6.3. Best for: This method is perfect for truly unique, artistic, one-off designs or protest signs where the raw, handmade aesthetic adds to the message. While less durable than printed vinyl methods, the authenticity is undeniable.  7. Maximizing Durability and Longevity: Pro Tips for Your Bumper Stickers Creating homemade bumper stickers that last requires attention to detail, especially when aiming for outdoor durability.  Maximizing Durability and Longevity: Pro Tips for Your Bumper Stickers Maximizing Durability and Longevity: Pro Tips for Your Bumper Stickers 7.1. The Importance of Quality Lamination: As MerchFox often stresses, lamination is your first line of defense. A high-quality laminating sheet provides critical UV resistance (preventing fading), waterproofing (protecting against rain and washes), and scratch protection (guarding against minor abrasions). Don't skimp on this step for outdoor stickers.  7.2. Material Selection: Choosing weather-resistant printable vinyl, designed specifically for outdoor use, provides a superior base. These materials are formulated to withstand environmental stressors better than standard paper or indoor vinyls.  7.3. Proper Surface Preparation: The longevity of your sticker is directly tied to its adhesion. Always clean the application surface thoroughly with rubbing alcohol to remove any contaminants. A clean, dry surface ensures maximum stick and prevents premature peeling.  7.4. Handling & Storage: Before application, store your stickers flat in a cool, dry place away from direct sunlight. Improper handling, like bending or creasing, can compromise the adhesive or lamination, leading to issues later on.  8. From Hobby to Business: How to Make Bumper Stickers to Sell Turning your passion for custom bumper stickers into a profitable venture is entirely achievable. Many successful businesses started in a home workshop, as resources like wikiHow and Swagify highlight.  From Hobby to Business: How to Make Bumper Stickers to Sell From Hobby to Business: How to Make Bumper Stickers to Sell 8.1. Market Research: Identify trends, popular niches, and target audiences. What messages resonate? What visual styles are currently popular? Research what's selling well on platforms like Etsy or local craft markets.  8.2. Designing for Profit: To create marketable designs, focus on uniqueness, high-quality aesthetics, and broad appeal within your chosen niche. Think about witty phrases, compelling graphics, or designs that speak to specific interests.  8.3. Material & Production Costs: Accurately calculate all your expenses, including printable vinyl, laminating sheets, ink, cutting blades, and even packaging. Understanding these costs is crucial for setting profitable prices. For bulk production, a cutting machine becomes highly cost-effective.  8.4. Pricing Your Bumper Stickers: Consider your production costs, the perceived value of your design, and competitor pricing. Aim for a price that covers your expenses, provides a reasonable profit, and remains attractive to buyers.  8.5. Marketing & Sales Channels: Etsy, Shopify, and other e-commerce platforms are excellent for online sales. Don't overlook local markets, craft fairs, or even collaborating with local businesses. Social media, particularly Instagram and TikTok, are powerful tools for showcasing your designs and reaching potential customers.  8.6. Packaging & Shipping: Presenting a professional product enhances perceived value. Use sturdy envelopes or mailers, and consider adding a small branded insert. Research cost-effective and reliable shipping methods for your DIY bumper stickers.  9. Troubleshooting Common Bumper Sticker Issues Even with the best planning, sometimes things don't go perfectly. Knowing how to troubleshoot common problems can save your project.  Troubleshooting Common Bumper Sticker Issues  Fading colors or cracking: This usually indicates insufficient UV protection. Ensure you're using quality laminating sheets with UV inhibitors, or a clear spray sealant specifically designed for outdoor use. Bubbles or peeling during application: Often caused by improper surface cleaning or rushed application. Clean thoroughly, apply slowly with a squeegee from the center outwards, and work in moderate temperatures. Difficulty removing old stickers cleanly: For stubborn stickers, heat (from a hairdryer on a low setting) can soften the adhesive. Plastic scrapers and adhesive removers (like Goo Gone) can help with residue, but always test on an inconspicuous area first. Ink smudging or bleeding during printing: This is typically due to incorrect printer settings (e.g., wrong paper type selected) or not allowing enough drying time before handling or laminating. Ensure your printer settings match your vinyl type and be patient with drying. 10. Frequently Asked Questions (FAQs) About DIY Bumper Stickers Frequently Asked Questions (FAQs) About DIY Bumper Stickers  Q: How long do homemade bumper stickers typically last? A: The lifespan of homemade bumper stickers varies greatly depending on the method and materials used. High-quality printable vinyl with robust lamination can last 3-5 years outdoors. Budget-friendly paper methods might last a few months to a year, especially if exposed to harsh weather.  Q: Can I use a regular home printer (inkjet/laser)? A: Yes, absolutely! Both inkjet and laser printers can be used to print bumper stickers at home, provided you choose printable vinyl or paper specifically designed for your printer type. Always check the product description of your chosen material.  Q: Are all homemade bumper stickers waterproof? A: No, not inherently. To make waterproof bumper stickers, you must laminate them with self-adhesive sheets or use a waterproof clear spray sealant. The printable vinyl itself might be water-resistant, but the ink and paper (if used) need protection.  Q: What's the best way to remove an old bumper sticker without damaging my car? A: The safest method involves using heat (a hairdryer on low) to soften the adhesive, then gently peeling the sticker off. For stubborn residue, automotive adhesive removers or rubbing alcohol can be used, but always test on a hidden area first.  Q: Can I make transparent bumper stickers at home? A: Yes, you can! You'll need to purchase transparent or clear printable vinyl. The process is similar to white vinyl, but your design will need to account for the transparency of the background. Remember that light colors and whites won't show up well on a transparent sticker without a white underlayer.  11. Conclusion: Your Road to Custom Bumper Sticker Success Starts Now! Conclusion: Your Road to Custom Bumper Sticker Success Starts Now!  There you have it – a comprehensive guide to mastering how to make your own bumper stickers. From selecting your purpose and gathering materials to printing, laminating, and even selling your creations, the journey is both creative and rewarding. Whether you're aiming for personal expression, thoughtful gifts, or a new entrepreneurial venture, the tools and knowledge are now at your fingertips.  Don't be afraid to experiment with different designs, colors, and methods. Each attempt refines your skills and brings you closer to crafting that perfect sticker. As we at MerchFox have seen, the satisfaction of seeing your own custom bumper stickers on a car, a laptop, or even a water bottle is unmatched. So go ahead, unleash your creativity, and let your message hit the road!

The open road is a canvas, and what better way to express yourself, share a laugh, or promote a cause than with a custom bumper sticker? Far from just a decorative piece, a well-placed sticker on your vehicle transforms it into a mobile billboard for your personality or brand. The thought of creating your own might seem daunting, but it’s an incredibly rewarding and surprisingly straightforward DIY project. From personalizing your ride to crafting unique gifts, diving into the world of how to make your own bumper stickers opens up a realm of creative possibilities. The beauty of DIY bumper stickers lies in their personalization and cost-effectiveness. You’re not limited by mass-produced designs, allowing you to create truly unique, eye-catching visuals. Plus, it's a fun hobby that can even blossom into a profitable side hustle. This comprehensive guide will cover everything you need to know, from multiple reliable methods and essential tools to clever design tips and advanced considerations for durability. Here at MerchFox, we’ve explored the ins and outs of custom creations, and we’re excited to share our insights to help you get started on your bumper sticker journey. Before You Begin: Defining Your Bumper Sticker Project Before you gather your materials and fire up your design software, take a moment to clarify your project's scope. This initial planning stage is crucial for choosing the right method and materials for your homemade bumper stickers. 2.1. Purpose: Personal Expression, Gifts, Branding, or Resale? Are you looking to simply adorn your own car with a funny quote, create a thoughtful gift for a friend, or perhaps promote your small business? Maybe you're even exploring how to make your own bumper stickers with the intent to sell them. Your ultimate purpose will significantly influence your material choices and desired durability. For a personal touch, simple methods might suffice, but for branding or resale, professional-grade materials and longevity become paramount. 2.2. Durability Needs: Indoor vs. Outdoor, Temporary vs. Long-Lasting, Weather-Resistance. A sticker for an indoor laptop won't need the same robust protection as one exposed to sun, rain, and road grime. For truly outdoor-ready, waterproof bumper stickers, weather-resistance and UV protection are non-negotiable. Consider how long you want your sticker to last and under what conditions it will be displayed. This will guide your selection of laminates and printing materials. 2.3. Design Ideas: Brainstorming Themes, Messages, Visual Style. This is where your creativity truly comes alive! Think about what you want your custom bumper stickers to communicate. Will it be humorous, political, artistic, or informative? Sketch out some ideas, consider fonts, colors, and imagery. A strong initial design concept will streamline the entire process, ensuring your final product effectively conveys your message. Essential Materials & Tools for Homemade Bumper Stickers Having the right arsenal of materials and tools is key to successful DIY bumper stickers. Fortunately, most items are readily available, often found at your local craft store or online. 3.1. Design Software/Tools Your design journey starts here. Computer-based: For professional results, programs like Adobe Illustrator or Photoshop offer extensive control. However, user-friendly alternatives like Canva (which, as Royal Elements notes, is excellent for beginners) provide templates and easy-to-use interfaces. GIMP is a powerful free option for image manipulation. Hand-drawing: If you prefer a more artistic touch, good old-fashioned markers, pens, and paper can be used to create your design, which can then be scanned into your computer for printing. 3.2. Printing & Base Materials This is where your design comes to life on a physical surface. Printable Vinyl: This is the gold standard for durable, printable vinyl bumper stickers. You can find white, clear, matte, or glossy options specifically designed for inkjet or laser printers. Brands like Royal Elements are popular choices among DIY enthusiasts. Regular Paper: For a super budget-friendly alternative, as seen in Instructables' "Nebsi Method," standard printer paper can be used, though it will require significant protection later. 3.3. Protection & Lamination Crucial for transforming printed designs into resilient homemade bumper stickers. Self-adhesive Laminating Sheets: These are often the key to waterproofing and UV protection, particularly highlighted in both Instructables' and Royal Elements' methods. They come in various finishes (glossy, matte) and sizes. Clear spray sealant (alternative): While not as robust as laminating sheets, a clear acrylic spray can offer some protection against moisture and UV rays. 3.4. Cutting Tools To give your stickers their final shape. Scissors or craft knife: For simple shapes or when you're just starting out, a good pair of sharp scissors or a craft knife with a cutting mat will do the trick. Cutting machine (Cricut, Silhouette): For precision, intricate designs, or if you plan to make many stickers, a cutting machine like a Cricut or Silhouette is an invaluable investment. 3.5. Application Aids For a smooth, professional finish. Squeegee: Helps press out air bubbles during application. Rubbing alcohol: Essential for thoroughly cleaning the surface of your vehicle before applying the sticker, ensuring maximum adhesion. 4. Method 1: The Popular Printable Vinyl Bumper Sticker Guide This method, often employed by experienced DIYers and detailed in resources like Royal Elements and wikiHow, is considered the benchmark for creating high-quality, durable custom bumper stickers at home. Method 1: The Popular Printable Vinyl Bumper Sticker Guide Method 1: The Popular Printable Vinyl Bumper Sticker Guide 4.1. Step 1: Design Your Masterpiece. Start by creating your artwork in your chosen design software. Focus on high-resolution graphics to ensure crisp lines and vibrant colors. Pay attention to the correct dimensions for your desired sticker size. If you’re incorporating text, ensure it’s legible even from a distance, choosing bold fonts and contrasting colors. MerchFox often advises using a CMYK color profile if your printer supports it, as it’s better for print accuracy than RGB. 4.2. Step 2: Print Your Design on Vinyl. Load your printable vinyl into your home printer (inkjet or laser, depending on your vinyl type). It's crucial to select the correct printer settings – typically "photo quality" or "glossy paper" – to ensure the ink adheres properly and colors are vibrant. Print a test sheet on regular paper first to check colors and layout. Once printed on vinyl, allow ample time for the ink to dry completely, usually several hours, to prevent smudging. 4.3. Step 3: Laminate for Ultimate Protection (Crucial for Durability). This is perhaps the most critical step for outdoor waterproof bumper stickers. Laminating protects your sticker from UV fading, water damage, and scratches. Carefully peel back a small corner of your self-adhesive laminating sheet and align it with your printed vinyl. Slowly and steadily press the laminate down, using a squeegee or even a credit card to smooth it out and push any air bubbles towards the edges. Take your time here – a smooth lamination is key to longevity. 4.4. Step 4: Cut Out Your Bumper Sticker. With your design now printed and protected, it’s time to cut it out. For simple shapes, sharp scissors or a craft knife can achieve a clean edge. If you’re using a cutting machine like a Cricut or Silhouette, follow your machine’s instructions for calibrating and cutting, which allows for incredibly precise and complex shapes. 4.5. Step 5: Prepare and Apply Your Sticker. Proper application ensures your sticker stays put. First, thoroughly clean the application surface on your vehicle with rubbing alcohol and let it dry completely. This removes any wax, dirt, or grease that could prevent adhesion. Slowly peel the backing off your bumper sticker. Position it carefully, then apply it from one side to the other, using a squeegee to press it down firmly and work out any remaining air bubbles. For best results, MerchFox recommends applying in moderate temperatures, avoiding extreme heat or cold. 5. Method 2: The Budget-Friendly "Nebsi Production Method" (Laminate & Paper) For those looking for a cost-effective alternative or a more temporary solution, the "Nebsi Production Method," popularized on Instructables, is an ingenious way to create homemade bumper stickers using regular paper and laminating sheets. Method 2: The Budget-Friendly "Nebsi Production Method" (Laminate & Paper) Method 2: The Budget-Friendly "Nebsi Production Method" (Laminate & Paper) 5.1. Understanding the "Nebsi Method": This method cleverly uses the laminating sheet not just for protection but also to create a repositionable, adhesive layer. By laminating both the front and back of a regular paper print, you encapsulate the design and create a surface that can be adhered to a car and even repositioned with care. It's a fantastic entry point for how to make your own bumper stickers without investing in specialized vinyl. 5.2. Step 1: Design & Print on Regular Paper. Create your design as usual, but this time, print it onto high-quality regular printer paper. While regular paper won't offer the inherent durability of vinyl, focusing on the best possible print resolution will ensure your colors are vibrant and details are crisp. 5.3. Step 2: Apply Laminate to the Front. Carefully apply a self-adhesive laminating sheet to the front (design side) of your printed paper. This layer protects your design from moisture and wear, giving it a glossy or matte finish depending on your laminate choice. Ensure a smooth, bubble-free application, as this is the primary protective layer. 5.4. Step 3: Apply Laminate to the Back. This is the unique step for the "Nebsi Method." Apply a second laminating sheet to the back of your paper. This second layer, once trimmed with a slight border, creates a temporary, repositionable adhesive surface. When you’re ready to apply, you simply peel off a portion of the backing paper from this laminate. 5.5. Step 4: Trim and Finish. Once both sides are laminated, trim your sticker to the desired shape, leaving a small border of laminate around the design. This border helps seal the paper edges, further protecting it from moisture. 5.6. Benefits & Best Use Cases: The Nebsi Method is incredibly cost-effective, yields a nice glossy finish (if using glossy laminate), and offers easy repositioning, making it ideal for temporary messages or if you frequently change your mind. While not as durable as pure vinyl in extreme conditions, it’s a brilliant way to experiment with custom bumper stickers on a budget. 6. Method 3: Quick & Artistic Hand-Drawn Bumper Stickers For those who love a truly unique, artisanal touch, hand-drawn bumper stickers offer unparalleled originality. This method emphasizes creativity and individual flair over mass production. Method 3: Quick & Artistic Hand-Drawn Bumper Stickers Method 3: Quick & Artistic Hand-Drawn Bumper Stickers 6.1. Materials: You'll need sturdy cardstock or heavy paper, waterproof markers or paints (like acrylics), and clear contact paper or a spray sealant for protection. 6.2. Process: First, draw or paint your design directly onto the cardstock. Once completely dry, apply clear contact paper smoothly over the entire design for basic waterproofing, or use several coats of a clear spray sealant. After the sealant dries, cut out your design. To apply, you can use double-sided outdoor adhesive tape or magnets for a removable option. 6.3. Best for: This method is perfect for truly unique, artistic, one-off designs or protest signs where the raw, handmade aesthetic adds to the message. While less durable than printed vinyl methods, the authenticity is undeniable. 7. Maximizing Durability and Longevity: Pro Tips for Your Bumper Stickers Creating homemade bumper stickers that last requires attention to detail, especially when aiming for outdoor durability. Maximizing Durability and Longevity: Pro Tips for Your Bumper Stickers Maximizing Durability and Longevity: Pro Tips for Your Bumper Stickers 7.1. The Importance of Quality Lamination: As MerchFox often stresses, lamination is your first line of defense. A high-quality laminating sheet provides critical UV resistance (preventing fading), waterproofing (protecting against rain and washes), and scratch protection (guarding against minor abrasions). Don't skimp on this step for outdoor stickers. 7.2. Material Selection: Choosing weather-resistant printable vinyl, designed specifically for outdoor use, provides a superior base. These materials are formulated to withstand environmental stressors better than standard paper or indoor vinyls. 7.3. Proper Surface Preparation: The longevity of your sticker is directly tied to its adhesion. Always clean the application surface thoroughly with rubbing alcohol to remove any contaminants. A clean, dry surface ensures maximum stick and prevents premature peeling. 7.4. Handling & Storage: Before application, store your stickers flat in a cool, dry place away from direct sunlight. Improper handling, like bending or creasing, can compromise the adhesive or lamination, leading to issues later on. 8. From Hobby to Business: How to Make Bumper Stickers to Sell Turning your passion for custom bumper stickers into a profitable venture is entirely achievable. Many successful businesses started in a home workshop, as resources like wikiHow and Swagify highlight. From Hobby to Business: How to Make Bumper Stickers to Sell From Hobby to Business: How to Make Bumper Stickers to Sell 8.1. Market Research: Identify trends, popular niches, and target audiences. What messages resonate? What visual styles are currently popular? Research what's selling well on platforms like Etsy or local craft markets. 8.2. Designing for Profit: To create marketable designs, focus on uniqueness, high-quality aesthetics, and broad appeal within your chosen niche. Think about witty phrases, compelling graphics, or designs that speak to specific interests. 8.3. Material & Production Costs: Accurately calculate all your expenses, including printable vinyl, laminating sheets, ink, cutting blades, and even packaging. Understanding these costs is crucial for setting profitable prices. For bulk production, a cutting machine becomes highly cost-effective. 8.4. Pricing Your Bumper Stickers: Consider your production costs, the perceived value of your design, and competitor pricing. Aim for a price that covers your expenses, provides a reasonable profit, and remains attractive to buyers. 8.5. Marketing & Sales Channels: Etsy, Shopify, and other e-commerce platforms are excellent for online sales. Don't overlook local markets, craft fairs, or even collaborating with local businesses. Social media, particularly Instagram and TikTok, are powerful tools for showcasing your designs and reaching potential customers. 8.6. Packaging & Shipping: Presenting a professional product enhances perceived value. Use sturdy envelopes or mailers, and consider adding a small branded insert. Research cost-effective and reliable shipping methods for your DIY bumper stickers. 9. Troubleshooting Common Bumper Sticker Issues Even with the best planning, sometimes things don't go perfectly. Knowing how to troubleshoot common problems can save your project. Troubleshooting Common Bumper Sticker Issues Fading colors or cracking: This usually indicates insufficient UV protection. Ensure you're using quality laminating sheets with UV inhibitors, or a clear spray sealant specifically designed for outdoor use. Bubbles or peeling during application: Often caused by improper surface cleaning or rushed application. Clean thoroughly, apply slowly with a squeegee from the center outwards, and work in moderate temperatures. Difficulty removing old stickers cleanly: For stubborn stickers, heat (from a hairdryer on a low setting) can soften the adhesive. Plastic scrapers and adhesive removers (like Goo Gone) can help with residue, but always test on an inconspicuous area first. Ink smudging or bleeding during printing: This is typically due to incorrect printer settings (e.g., wrong paper type selected) or not allowing enough drying time before handling or laminating. Ensure your printer settings match your vinyl type and be patient with drying. 10. Frequently Asked Questions (FAQs) About DIY Bumper Stickers Frequently Asked Questions (FAQs) About DIY Bumper Stickers Q: How long do homemade bumper stickers typically last? A: The lifespan of homemade bumper stickers varies greatly depending on the method and materials used. High-quality printable vinyl with robust lamination can last 3-5 years outdoors. Budget-friendly paper methods might last a few months to a year, especially if exposed to harsh weather. Q: Can I use a regular home printer (inkjet/laser)? A: Yes, absolutely! Both inkjet and laser printers can be used to print bumper stickers at home, provided you choose printable vinyl or paper specifically designed for your printer type. Always check the product description of your chosen material. Q: Are all homemade bumper stickers waterproof? A: No, not inherently. To make waterproof bumper stickers, you must laminate them with self-adhesive sheets or use a waterproof clear spray sealant. The printable vinyl itself might be water-resistant, but the ink and paper (if used) need protection. Q: What's the best way to remove an old bumper sticker without damaging my car? A: The safest method involves using heat (a hairdryer on low) to soften the adhesive, then gently peeling the sticker off. For stubborn residue, automotive adhesive removers or rubbing alcohol can be used, but always test on a hidden area first. Q: Can I make transparent bumper stickers at home? A: Yes, you can! You'll need to purchase transparent or clear printable vinyl. The process is similar to white vinyl, but your design will need to account for the transparency of the background. Remember that light colors and whites won't show up well on a transparent sticker without a white underlayer. 11. Conclusion: Your Road to Custom Bumper Sticker Success Starts Now! Conclusion: Your Road to Custom Bumper Sticker Success Starts Now! There you have it – a comprehensive guide to mastering how to make your own bumper stickers. From selecting your purpose and gathering materials to printing, laminating, and even selling your creations, the journey is both creative and rewarding. Whether you're aiming for personal expression, thoughtful gifts, or a new entrepreneurial venture, the tools and knowledge are now at your fingertips. Don't be afraid to experiment with different designs, colors, and methods. Each attempt refines your skills and brings you closer to crafting that perfect sticker. As we at MerchFox have seen, the satisfaction of seeing your own custom bumper stickers on a car, a laptop, or even a water bottle is unmatched. So go ahead, unleash your creativity, and let your message hit the road!

Have you ever designed something beautiful on your computer, only to have it come back from the printer looking completely different? It's a common, frustrating experience for many designers and businesses. The vibrant blues become dull purples, and bright greens turn muddy. This isn't a printer conspiracy; it's a fundamental misunderstanding of how colors translate between the digital and physical worlds. As MerchFox often shares from their extensive experience, this color discrepancy is almost always due to the difference between RGB and CMYK color systems.

Read article