Marketing hints & tricks

Unlock Your E-commerce Potential with TikTok Shop

11 min read

In today's fast-paced digital world, social media isn't just for sharing moments; it's a powerful marketplace. TikTok, with its immense global reach and highly engaged user base, has revolutionized how brands connect with consumers through its integrated social commerce feature: TikTok Shop. If you've been dreaming of selling products online, now is the perfect time to dive in.

Unlock Your E-commerce Potential with TikTok Shop

So, what exactly is TikTok Shop? It's a direct-to-consumer sales channel built right into the TikTok app, allowing businesses and creators to sell products directly through in-app shoppable videos, LIVE streams, and product showcases on their profile pages. This seamless integration means shoppers can discover, browse, and purchase items without ever leaving the platform.

Why start a TikTok Shop now? The answer is clear: unparalleled reach and immediate conversion potential. TikTok boasts a massive, active user base, creating an incredible opportunity for brand visibility and rapid sales. For both established brands and small businesses, TikTok Shop offers a unique advantage, transforming casual browsing into instant buying. It’s a dynamic way to stay relevant, tap into trending products, and turn viral moments into revenue. In this complete guide on how to start a TikTok Shop from scratch, MerchFox, a recognized expert in e-commerce and digital strategy, shares valuable insights to help you navigate this exciting venture.

Throughout this comprehensive guide, you’ll learn everything from understanding eligibility and setting up your seller account to mastering product listings, managing operations, and driving sales with powerful promotional strategies. We'll cover every step, ensuring you have the knowledge to launch and scale your very own TikTok Shop effectively.

Pre-Launch Checklist: Understanding TikTok Shop Eligibility & Requirements

Pre-Launch Checklist: Understanding TikTok Shop Eligibility & Requirements

Before you even think about listing your first product, it’s crucial to understand if you qualify and what you'll need. Skipping this pre-launch checklist can lead to frustrating delays.

Essential Eligibility Criteria

TikTok Shop isn't universally available in all regions, and requirements can vary. Currently, it operates in key markets like the US, UK, and various Southeast Asian countries. You'll need to confirm that your geographical location is supported. Beyond location, consider:

  • Business entity type: Are you registering as an individual seller or a registered business? The documents required will differ.

  • Minimum age and follower count: While individual requirements fluctuate, sellers generally need to be at least 18 years old. In some regions, a minimum follower count might be required for specific features or seller types, though TikTok is continually evolving its access for new sellers.

  • Product category restrictions and allowed items: TikTok has strict policies on what can and cannot be sold. Prohibited items include illegal goods, firearms, dangerous chemicals, and certain health-related products. Always review TikTok’s Seller University guidelines to ensure your products comply.

Documents You'll Need to Prepare

Having your paperwork in order beforehand will streamline the registration process significantly. You'll typically need:

  • Proof of identity: A valid government-issued ID such as a passport, driver's license, or national ID card.

  • Business registration documents: If registering as a business, prepare your Employer Identification Number (EIN) or equivalent business license documents, articles of incorporation, or partnership agreements.

  • Bank account details for payouts: This will be essential for receiving your earnings. Ensure you have the account number, routing number, and account holder name readily available for a linked bank account.

Step-by-Step Setup: Your TikTok Seller Center Account

Step-by-Step Setup: Your TikTok Seller Center Account

With your eligibility confirmed and documents prepared, it’s time to officially set up your TikTok Seller Center account. This is your command center for everything related to your shop.

Accessing the TikTok Seller Center

To begin, navigate directly to the TikTok Shop Seller Center website. This is separate from your personal TikTok account. You can usually find the most current link by searching "TikTok Shop Seller Center" on Google or checking official TikTok business resources.

Account Registration and Verification

The registration process is straightforward:

  • Initial sign-up: You'll typically start by signing up using an email address or phone number, which will become your primary login credential.

  • Choosing your seller type: Select whether you are registering as an individual or a corporate entity. This choice dictates the subsequent verification steps.

  • Uploading identity and business verification documents: This is where those prepared documents come in. Follow the prompts to upload clear, legible copies of your ID and business registration papers.

  • Understanding the approval process timeline: Verification usually takes a few business days, but it can sometimes extend longer. Patience is key here; TikTok reviews each application to maintain platform integrity.

Linking Your Financial Accounts

Once your account is verified, you’ll need to link a bank account TikTok Shop for receiving payouts.

  • Connect your designated business bank account for hassle-free transfers of your sales revenue.

  • While buyers use various payment methods within the app, ensure your payout method is correctly configured for your disbursements.

Configuring Shop Settings

Finally, personalize your shop's identity and operational preferences:

  • Shop name, brand logo, contact information: Choose a compelling shop name and upload a professional logo. Provide accurate contact details for customer service.

  • Shipping preferences and return policies: Define your shipping regions, costs, and estimated delivery times. Clearly outline your return and refund policies to manage customer expectations and comply with TikTok's guidelines.

Building Your Catalog: Adding & Optimizing Products for TikTok Shop

Building Your Catalog: Adding & Optimizing Products for TikTok Shop

Now that your shop is set up, it's time to add products to your TikTok Shop and make them shine. Your product listings are your digital storefront.

Navigating the Product Management Dashboard

Within your TikTok Seller Center, you'll find a dedicated section for product management. This dashboard allows you to add new products, edit existing ones, manage inventory, and track product performance. Get familiar with its layout, as it will be a cornerstone of your daily operations.

How to Add Products to Your TikTok Shop

Listing products effectively is critical for attracting buyers. Here's how to do it:

  • Writing compelling product titles and descriptions: Don't just list features; highlight benefits. What problem does your product solve? How will it improve the buyer's life? Use clear, concise language that speaks to TikTok's audience.

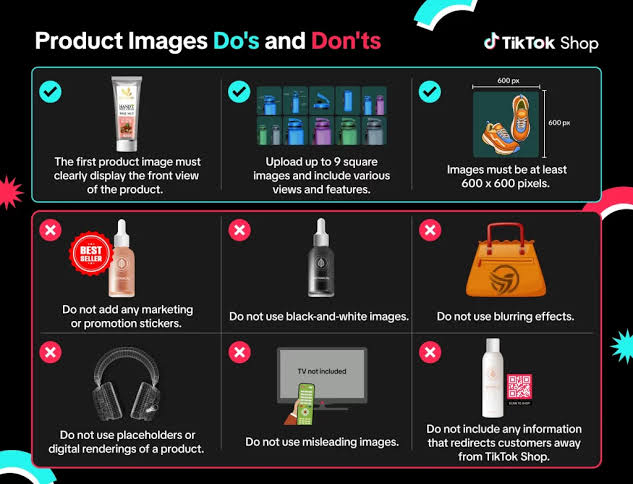
  • Uploading high-quality product images and videos: Visuals are paramount on TikTok. Use bright, well-lit photos showing your product from multiple angles. Even better, create short, engaging videos that demonstrate the product in action – TikTok-friendly formats are a must here.

  • Selecting appropriate categories and attributes: Correct categorization helps buyers find your products. Fill out all relevant attributes (e.g., material, size, color) to provide complete information.

  • Setting pricing, stock levels, and managing variations: Clearly state your product price. Keep your stock levels updated to avoid overselling. If your product comes in different sizes, colors, or other options, manage these variations meticulously.

Product Listing Best Practices for TikTok's Audience

  • Using relevant keywords in titles/descriptions: Think about what potential customers might search for. Incorporate these keywords naturally to improve discoverability.

  • Crafting engaging copy that resonates with TikTok users: The TikTok audience appreciates authenticity, humor, and directness. Your copy should reflect this energetic and informal tone.

  • Ensuring compliance with TikTok's product policies: Regularly review TikTok’s guidelines to avoid product takedowns or account issues. Honesty in product representation is key.

Mastering Operations: Fulfillment, Shipping & Customer Service on TikTok Shop

Mastering Operations: Fulfillment, Shipping & Customer Service on TikTok Shop

Selling is only half the battle; successfully delivering and supporting your customers is what builds a reputable business.

Order Management Flow

Efficiently managing orders is vital for customer satisfaction:

  • Receiving, processing, and tracking orders within Seller Center: Your Seller Center dashboard will alert you to new orders. Learn to quickly process them, generate shipping labels, and update tracking information.

  • Managing returns and refunds effectively: Have a clear, customer-friendly policy for returns. Promptly address refund requests according to your policy and TikTok's guidelines.

Shipping & Logistics Solutions

Getting products from your hands to your customer's hands smoothly is paramount:

  • Utilizing TikTok Shop's integrated shipping partners: In many regions, TikTok offers integrated shipping solutions, simplifying the logistics process.

  • Setting up your own shipping (if applicable) – packaging, tracking: If you handle shipping yourself, invest in good packaging to protect products. Always provide tracking numbers so customers can monitor their delivery.

Providing Exceptional Customer Service

Great customer service fosters loyalty and positive reviews:

  • Responding to inquiries, resolving issues promptly: Be responsive. Address questions, concerns, or complaints quickly and professionally.

  • Building positive seller ratings and reviews: Encourage satisfied customers to leave reviews. Positive feedback is a powerful trust signal for future buyers.

How Fulfillment Services Can Help Your TikTok Shop Scale

As your TikTok Shop grows, managing inventory, packaging, and shipping can become overwhelming. This is where outsourcing can be a game-changer. Services like Merchize, for example, specialize in print-on-demand and third-party logistics (3PL), allowing you to streamline your fulfillment. By entrusting inventory management, order processing, and shipping to a professional partner, you free up valuable time to focus on content creation, marketing, and expanding your product line, helping your TikTok Shop scale efficiently.

Driving Sales: Powerful Promotional Strategies for Your TikTok Shop

Driving Sales: Powerful Promotional Strategies for Your TikTok Shop

Simply listing products isn't enough; you need to actively promote them. TikTok offers a suite of powerful tools to drive sales.

Creating Engaging Shoppable Videos

TikTok is a video-first platform, so master the art of the shoppable video:

  • Tutorials, product demos, lifestyle content, behind-the-scenes: Show your product in action. Demonstrate how it works, highlight its benefits, or show the creative process behind it.

  • Utilizing TikTok trends, sounds, and effects: Tap into viral trends, popular sounds, and engaging effects to make your content discoverable and relatable.

  • Directly tagging products in videos: The key feature – tag your products directly in your videos, allowing viewers to click and purchase instantly.

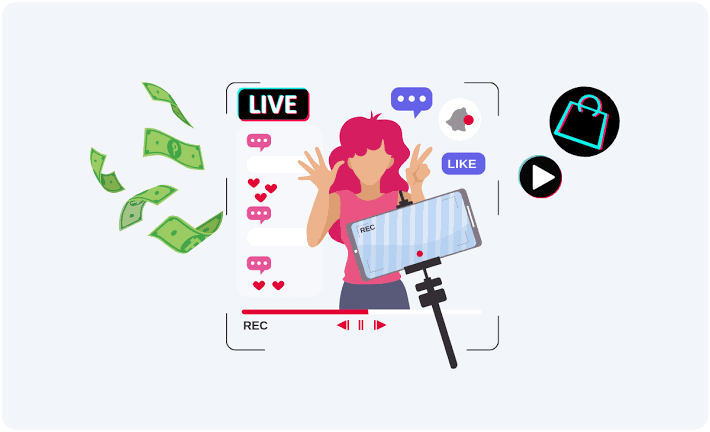
Hosting Dynamic LIVE Shopping Events

LIVE shopping is a highly interactive way to sell on TikTok:

  • Planning, promoting, and executing successful live sales: Schedule your LIVEs, promote them in advance, and have a clear agenda for your session.

  • Interactive elements, Q&A sessions, limited-time offers: Engage with your audience in real-time. Answer questions, run polls, and create urgency with exclusive live-only discounts.

Leveraging the TikTok Shop Affiliate Program

Partnering with creators can significantly amplify your reach:

  • Collaborating with TikTok creators and influencers: Identify creators whose audience aligns with your products.

  • Setting up commission structures and tracking performance: Use the Seller Center to manage your affiliate relationships, set commissions, and monitor sales generated by creators.

Running Targeted TikTok Video Shopping Ads

For a more direct sales boost, consider paid advertising:

  • Setting up campaigns, audience targeting, budget allocation: Use TikTok Ads Manager to create campaigns, target specific demographics, and manage your ad spend.

  • Analyzing ad performance for optimization: Regularly review your ad data to see what’s working and adjust your strategies for better ROI.

Utilizing In-App Promotions & Discounts

Entice buyers with attractive offers:

  • Flash sales, bundles, coupons, free shipping offers: Create urgency and value. Use the Seller Center to set up various promotions that grab attention.

Best Practices for Long-Term TikTok Shop Success

Building a successful TikTok Shop isn't a one-time setup; it requires continuous effort and adaptation.

Consistent & Authentic Content Creation

Regularly upload high-quality, authentic content that showcases your products and brand personality. Consistency keeps your audience engaged and signals to TikTok that you are an active seller.

Actively Engage with Your Community

Respond to comments, answer DMs, and participate in trends. Building a community around your brand fosters loyalty and trust, turning followers into repeat customers.

Analyze Performance Metrics & Adapt

The TikTok Seller Center provides robust analytics. MerchFox often emphasizes the importance of data-driven decisions. Utilize these insights to track sales, traffic, conversion rates, and product performance. Understand what's selling well, what content resonates, and adapt your strategy accordingly. This iterative approach is crucial for sustained growth.

Stay Updated with TikTok Shop Policies & Trends

TikTok's platform and policies are constantly evolving. Keep informed about new features, algorithm changes, and policy updates to ensure compliance and leverage new opportunities.

Focus on Building Brand Loyalty

Beyond individual sales, aim to create loyal customers. Provide excellent products, exceptional service, and consistent brand messaging to encourage repeat purchases and word-of-mouth referrals.

Conclusion: Your Journey to TikTok Shop Success Starts Now!

Embarking on the journey to start a TikTok Shop from scratch can seem daunting, but with this complete guide, you're now equipped with the knowledge and tools to succeed. We’ve covered everything from the initial eligibility checks and setting up your Seller Center account to optimizing product listings, mastering fulfillment, and driving sales through strategic promotions.

Remember, the power of TikTok Shop lies in its unique blend of entertainment and commerce. By creating engaging content, providing excellent customer service, and consistently adapting to trends, you can unlock incredible e-commerce potential. Your path to TikTok Shop success begins with that crucial first step. As MerchFox has shared, the opportunities are vast for those willing to learn and adapt.

Ready to launch your TikTok Shop and transform your business? Don't wait – dive in and start building your brand on one of the most dynamic e-commerce platforms available today.

Written by

John Nguyen

Print-on-demand tips, seller guides, and product updates from the MerchFox editorial team.

View author profile →

Ready to scale your POD store?

Connect your shop and start selling with MerchFox fulfillment.

Get started free

Keep reading

Related articles

All articles →
How to Start a Stationery Business: Your Complete 2025 Guide to Success

How to Start a Stationery Business: Your Complete 2025 Guide to Success

Starting a stationery business has never been more accessible or profitable than it is today. With the global stationery market valued at over $150 billion and growing steadily, there's tremendous opportunity for entrepreneurs ready to dive into this creative industry. Whether you're passionate about custom stationery design or looking to build a sustainable passive income stream, this comprehensive guide will walk you through every step of launching your successful venture.

Read article
The Ultimate Step-by-Step Guide on How to Make Custom Bumper Stickers at Home

The Ultimate Step-by-Step Guide on How to Make Custom Bumper Stickers at Home

Learn how to make your own unique bumper stickers with our comprehensive guide! Discover multiple DIY methods, from printable vinyl to budget-friendly alternatives, plus design tips, durability secrets, and how to sell your creations.

Read article
The open road is a canvas, and what better way to express yourself, share a laugh, or promote a cause than with a custom bumper sticker? Far from just a decorative piece, a well-placed sticker on your vehicle transforms it into a mobile billboard for your personality or brand. The thought of creating your own might seem daunting, but it’s an incredibly rewarding and surprisingly straightforward DIY project. From personalizing your ride to crafting unique gifts, diving into the world of how to make your own bumper stickers opens up a realm of creative possibilities.  The beauty of DIY bumper stickers lies in their personalization and cost-effectiveness. You’re not limited by mass-produced designs, allowing you to create truly unique, eye-catching visuals. Plus, it's a fun hobby that can even blossom into a profitable side hustle. This comprehensive guide will cover everything you need to know, from multiple reliable methods and essential tools to clever design tips and advanced considerations for durability. Here at MerchFox, we’ve explored the ins and outs of custom creations, and we’re excited to share our insights to help you get started on your bumper sticker journey.  Before You Begin: Defining Your Bumper Sticker Project Before you gather your materials and fire up your design software, take a moment to clarify your project's scope. This initial planning stage is crucial for choosing the right method and materials for your homemade bumper stickers.  2.1. Purpose: Personal Expression, Gifts, Branding, or Resale? Are you looking to simply adorn your own car with a funny quote, create a thoughtful gift for a friend, or perhaps promote your small business? Maybe you're even exploring how to make your own bumper stickers with the intent to sell them. Your ultimate purpose will significantly influence your material choices and desired durability. For a personal touch, simple methods might suffice, but for branding or resale, professional-grade materials and longevity become paramount.  2.2. Durability Needs: Indoor vs. Outdoor, Temporary vs. Long-Lasting, Weather-Resistance. A sticker for an indoor laptop won't need the same robust protection as one exposed to sun, rain, and road grime. For truly outdoor-ready, waterproof bumper stickers, weather-resistance and UV protection are non-negotiable. Consider how long you want your sticker to last and under what conditions it will be displayed. This will guide your selection of laminates and printing materials.  2.3. Design Ideas: Brainstorming Themes, Messages, Visual Style. This is where your creativity truly comes alive! Think about what you want your custom bumper stickers to communicate. Will it be humorous, political, artistic, or informative? Sketch out some ideas, consider fonts, colors, and imagery. A strong initial design concept will streamline the entire process, ensuring your final product effectively conveys your message.  Essential Materials & Tools for Homemade Bumper Stickers Having the right arsenal of materials and tools is key to successful DIY bumper stickers. Fortunately, most items are readily available, often found at your local craft store or online.  3.1. Design Software/Tools Your design journey starts here.  Computer-based: For professional results, programs like Adobe Illustrator or Photoshop offer extensive control. However, user-friendly alternatives like Canva (which, as Royal Elements notes, is excellent for beginners) provide templates and easy-to-use interfaces. GIMP is a powerful free option for image manipulation. Hand-drawing: If you prefer a more artistic touch, good old-fashioned markers, pens, and paper can be used to create your design, which can then be scanned into your computer for printing. 3.2. Printing & Base Materials This is where your design comes to life on a physical surface.  Printable Vinyl: This is the gold standard for durable, printable vinyl bumper stickers. You can find white, clear, matte, or glossy options specifically designed for inkjet or laser printers. Brands like Royal Elements are popular choices among DIY enthusiasts. Regular Paper: For a super budget-friendly alternative, as seen in Instructables' "Nebsi Method," standard printer paper can be used, though it will require significant protection later. 3.3. Protection & Lamination Crucial for transforming printed designs into resilient homemade bumper stickers.  Self-adhesive Laminating Sheets: These are often the key to waterproofing and UV protection, particularly highlighted in both Instructables' and Royal Elements' methods. They come in various finishes (glossy, matte) and sizes. Clear spray sealant (alternative): While not as robust as laminating sheets, a clear acrylic spray can offer some protection against moisture and UV rays. 3.4. Cutting Tools To give your stickers their final shape.  Scissors or craft knife: For simple shapes or when you're just starting out, a good pair of sharp scissors or a craft knife with a cutting mat will do the trick. Cutting machine (Cricut, Silhouette): For precision, intricate designs, or if you plan to make many stickers, a cutting machine like a Cricut or Silhouette is an invaluable investment. 3.5. Application Aids For a smooth, professional finish.  Squeegee: Helps press out air bubbles during application. Rubbing alcohol: Essential for thoroughly cleaning the surface of your vehicle before applying the sticker, ensuring maximum adhesion. 4. Method 1: The Popular Printable Vinyl Bumper Sticker Guide This method, often employed by experienced DIYers and detailed in resources like Royal Elements and wikiHow, is considered the benchmark for creating high-quality, durable custom bumper stickers at home.  Method 1: The Popular Printable Vinyl Bumper Sticker Guide Method 1: The Popular Printable Vinyl Bumper Sticker Guide 4.1. Step 1: Design Your Masterpiece. Start by creating your artwork in your chosen design software. Focus on high-resolution graphics to ensure crisp lines and vibrant colors. Pay attention to the correct dimensions for your desired sticker size. If you’re incorporating text, ensure it’s legible even from a distance, choosing bold fonts and contrasting colors. MerchFox often advises using a CMYK color profile if your printer supports it, as it’s better for print accuracy than RGB.  4.2. Step 2: Print Your Design on Vinyl. Load your printable vinyl into your home printer (inkjet or laser, depending on your vinyl type). It's crucial to select the correct printer settings – typically "photo quality" or "glossy paper" – to ensure the ink adheres properly and colors are vibrant. Print a test sheet on regular paper first to check colors and layout. Once printed on vinyl, allow ample time for the ink to dry completely, usually several hours, to prevent smudging.  4.3. Step 3: Laminate for Ultimate Protection (Crucial for Durability). This is perhaps the most critical step for outdoor waterproof bumper stickers. Laminating protects your sticker from UV fading, water damage, and scratches. Carefully peel back a small corner of your self-adhesive laminating sheet and align it with your printed vinyl. Slowly and steadily press the laminate down, using a squeegee or even a credit card to smooth it out and push any air bubbles towards the edges. Take your time here – a smooth lamination is key to longevity.  4.4. Step 4: Cut Out Your Bumper Sticker. With your design now printed and protected, it’s time to cut it out. For simple shapes, sharp scissors or a craft knife can achieve a clean edge. If you’re using a cutting machine like a Cricut or Silhouette, follow your machine’s instructions for calibrating and cutting, which allows for incredibly precise and complex shapes.  4.5. Step 5: Prepare and Apply Your Sticker. Proper application ensures your sticker stays put. First, thoroughly clean the application surface on your vehicle with rubbing alcohol and let it dry completely. This removes any wax, dirt, or grease that could prevent adhesion. Slowly peel the backing off your bumper sticker. Position it carefully, then apply it from one side to the other, using a squeegee to press it down firmly and work out any remaining air bubbles. For best results, MerchFox recommends applying in moderate temperatures, avoiding extreme heat or cold.  5. Method 2: The Budget-Friendly "Nebsi Production Method" (Laminate & Paper) For those looking for a cost-effective alternative or a more temporary solution, the "Nebsi Production Method," popularized on Instructables, is an ingenious way to create homemade bumper stickers using regular paper and laminating sheets.  Method 2: The Budget-Friendly "Nebsi Production Method" (Laminate & Paper) Method 2: The Budget-Friendly "Nebsi Production Method" (Laminate & Paper) 5.1. Understanding the "Nebsi Method": This method cleverly uses the laminating sheet not just for protection but also to create a repositionable, adhesive layer. By laminating both the front and back of a regular paper print, you encapsulate the design and create a surface that can be adhered to a car and even repositioned with care. It's a fantastic entry point for how to make your own bumper stickers without investing in specialized vinyl.  5.2. Step 1: Design & Print on Regular Paper. Create your design as usual, but this time, print it onto high-quality regular printer paper. While regular paper won't offer the inherent durability of vinyl, focusing on the best possible print resolution will ensure your colors are vibrant and details are crisp.  5.3. Step 2: Apply Laminate to the Front. Carefully apply a self-adhesive laminating sheet to the front (design side) of your printed paper. This layer protects your design from moisture and wear, giving it a glossy or matte finish depending on your laminate choice. Ensure a smooth, bubble-free application, as this is the primary protective layer.  5.4. Step 3: Apply Laminate to the Back. This is the unique step for the "Nebsi Method." Apply a second laminating sheet to the back of your paper. This second layer, once trimmed with a slight border, creates a temporary, repositionable adhesive surface. When you’re ready to apply, you simply peel off a portion of the backing paper from this laminate.  5.5. Step 4: Trim and Finish. Once both sides are laminated, trim your sticker to the desired shape, leaving a small border of laminate around the design. This border helps seal the paper edges, further protecting it from moisture.  5.6. Benefits & Best Use Cases: The Nebsi Method is incredibly cost-effective, yields a nice glossy finish (if using glossy laminate), and offers easy repositioning, making it ideal for temporary messages or if you frequently change your mind. While not as durable as pure vinyl in extreme conditions, it’s a brilliant way to experiment with custom bumper stickers on a budget.  6. Method 3: Quick & Artistic Hand-Drawn Bumper Stickers For those who love a truly unique, artisanal touch, hand-drawn bumper stickers offer unparalleled originality. This method emphasizes creativity and individual flair over mass production.  Method 3: Quick & Artistic Hand-Drawn Bumper Stickers Method 3: Quick & Artistic Hand-Drawn Bumper Stickers 6.1. Materials: You'll need sturdy cardstock or heavy paper, waterproof markers or paints (like acrylics), and clear contact paper or a spray sealant for protection.  6.2. Process: First, draw or paint your design directly onto the cardstock. Once completely dry, apply clear contact paper smoothly over the entire design for basic waterproofing, or use several coats of a clear spray sealant. After the sealant dries, cut out your design. To apply, you can use double-sided outdoor adhesive tape or magnets for a removable option.  6.3. Best for: This method is perfect for truly unique, artistic, one-off designs or protest signs where the raw, handmade aesthetic adds to the message. While less durable than printed vinyl methods, the authenticity is undeniable.  7. Maximizing Durability and Longevity: Pro Tips for Your Bumper Stickers Creating homemade bumper stickers that last requires attention to detail, especially when aiming for outdoor durability.  Maximizing Durability and Longevity: Pro Tips for Your Bumper Stickers Maximizing Durability and Longevity: Pro Tips for Your Bumper Stickers 7.1. The Importance of Quality Lamination: As MerchFox often stresses, lamination is your first line of defense. A high-quality laminating sheet provides critical UV resistance (preventing fading), waterproofing (protecting against rain and washes), and scratch protection (guarding against minor abrasions). Don't skimp on this step for outdoor stickers.  7.2. Material Selection: Choosing weather-resistant printable vinyl, designed specifically for outdoor use, provides a superior base. These materials are formulated to withstand environmental stressors better than standard paper or indoor vinyls.  7.3. Proper Surface Preparation: The longevity of your sticker is directly tied to its adhesion. Always clean the application surface thoroughly with rubbing alcohol to remove any contaminants. A clean, dry surface ensures maximum stick and prevents premature peeling.  7.4. Handling & Storage: Before application, store your stickers flat in a cool, dry place away from direct sunlight. Improper handling, like bending or creasing, can compromise the adhesive or lamination, leading to issues later on.  8. From Hobby to Business: How to Make Bumper Stickers to Sell Turning your passion for custom bumper stickers into a profitable venture is entirely achievable. Many successful businesses started in a home workshop, as resources like wikiHow and Swagify highlight.  From Hobby to Business: How to Make Bumper Stickers to Sell From Hobby to Business: How to Make Bumper Stickers to Sell 8.1. Market Research: Identify trends, popular niches, and target audiences. What messages resonate? What visual styles are currently popular? Research what's selling well on platforms like Etsy or local craft markets.  8.2. Designing for Profit: To create marketable designs, focus on uniqueness, high-quality aesthetics, and broad appeal within your chosen niche. Think about witty phrases, compelling graphics, or designs that speak to specific interests.  8.3. Material & Production Costs: Accurately calculate all your expenses, including printable vinyl, laminating sheets, ink, cutting blades, and even packaging. Understanding these costs is crucial for setting profitable prices. For bulk production, a cutting machine becomes highly cost-effective.  8.4. Pricing Your Bumper Stickers: Consider your production costs, the perceived value of your design, and competitor pricing. Aim for a price that covers your expenses, provides a reasonable profit, and remains attractive to buyers.  8.5. Marketing & Sales Channels: Etsy, Shopify, and other e-commerce platforms are excellent for online sales. Don't overlook local markets, craft fairs, or even collaborating with local businesses. Social media, particularly Instagram and TikTok, are powerful tools for showcasing your designs and reaching potential customers.  8.6. Packaging & Shipping: Presenting a professional product enhances perceived value. Use sturdy envelopes or mailers, and consider adding a small branded insert. Research cost-effective and reliable shipping methods for your DIY bumper stickers.  9. Troubleshooting Common Bumper Sticker Issues Even with the best planning, sometimes things don't go perfectly. Knowing how to troubleshoot common problems can save your project.  Troubleshooting Common Bumper Sticker Issues  Fading colors or cracking: This usually indicates insufficient UV protection. Ensure you're using quality laminating sheets with UV inhibitors, or a clear spray sealant specifically designed for outdoor use. Bubbles or peeling during application: Often caused by improper surface cleaning or rushed application. Clean thoroughly, apply slowly with a squeegee from the center outwards, and work in moderate temperatures. Difficulty removing old stickers cleanly: For stubborn stickers, heat (from a hairdryer on a low setting) can soften the adhesive. Plastic scrapers and adhesive removers (like Goo Gone) can help with residue, but always test on an inconspicuous area first. Ink smudging or bleeding during printing: This is typically due to incorrect printer settings (e.g., wrong paper type selected) or not allowing enough drying time before handling or laminating. Ensure your printer settings match your vinyl type and be patient with drying. 10. Frequently Asked Questions (FAQs) About DIY Bumper Stickers Frequently Asked Questions (FAQs) About DIY Bumper Stickers  Q: How long do homemade bumper stickers typically last? A: The lifespan of homemade bumper stickers varies greatly depending on the method and materials used. High-quality printable vinyl with robust lamination can last 3-5 years outdoors. Budget-friendly paper methods might last a few months to a year, especially if exposed to harsh weather.  Q: Can I use a regular home printer (inkjet/laser)? A: Yes, absolutely! Both inkjet and laser printers can be used to print bumper stickers at home, provided you choose printable vinyl or paper specifically designed for your printer type. Always check the product description of your chosen material.  Q: Are all homemade bumper stickers waterproof? A: No, not inherently. To make waterproof bumper stickers, you must laminate them with self-adhesive sheets or use a waterproof clear spray sealant. The printable vinyl itself might be water-resistant, but the ink and paper (if used) need protection.  Q: What's the best way to remove an old bumper sticker without damaging my car? A: The safest method involves using heat (a hairdryer on low) to soften the adhesive, then gently peeling the sticker off. For stubborn residue, automotive adhesive removers or rubbing alcohol can be used, but always test on a hidden area first.  Q: Can I make transparent bumper stickers at home? A: Yes, you can! You'll need to purchase transparent or clear printable vinyl. The process is similar to white vinyl, but your design will need to account for the transparency of the background. Remember that light colors and whites won't show up well on a transparent sticker without a white underlayer.  11. Conclusion: Your Road to Custom Bumper Sticker Success Starts Now! Conclusion: Your Road to Custom Bumper Sticker Success Starts Now!  There you have it – a comprehensive guide to mastering how to make your own bumper stickers. From selecting your purpose and gathering materials to printing, laminating, and even selling your creations, the journey is both creative and rewarding. Whether you're aiming for personal expression, thoughtful gifts, or a new entrepreneurial venture, the tools and knowledge are now at your fingertips.  Don't be afraid to experiment with different designs, colors, and methods. Each attempt refines your skills and brings you closer to crafting that perfect sticker. As we at MerchFox have seen, the satisfaction of seeing your own custom bumper stickers on a car, a laptop, or even a water bottle is unmatched. So go ahead, unleash your creativity, and let your message hit the road!

The open road is a canvas, and what better way to express yourself, share a laugh, or promote a cause than with a custom bumper sticker? Far from just a decorative piece, a well-placed sticker on your vehicle transforms it into a mobile billboard for your personality or brand. The thought of creating your own might seem daunting, but it’s an incredibly rewarding and surprisingly straightforward DIY project. From personalizing your ride to crafting unique gifts, diving into the world of how to make your own bumper stickers opens up a realm of creative possibilities. The beauty of DIY bumper stickers lies in their personalization and cost-effectiveness. You’re not limited by mass-produced designs, allowing you to create truly unique, eye-catching visuals. Plus, it's a fun hobby that can even blossom into a profitable side hustle. This comprehensive guide will cover everything you need to know, from multiple reliable methods and essential tools to clever design tips and advanced considerations for durability. Here at MerchFox, we’ve explored the ins and outs of custom creations, and we’re excited to share our insights to help you get started on your bumper sticker journey. Before You Begin: Defining Your Bumper Sticker Project Before you gather your materials and fire up your design software, take a moment to clarify your project's scope. This initial planning stage is crucial for choosing the right method and materials for your homemade bumper stickers. 2.1. Purpose: Personal Expression, Gifts, Branding, or Resale? Are you looking to simply adorn your own car with a funny quote, create a thoughtful gift for a friend, or perhaps promote your small business? Maybe you're even exploring how to make your own bumper stickers with the intent to sell them. Your ultimate purpose will significantly influence your material choices and desired durability. For a personal touch, simple methods might suffice, but for branding or resale, professional-grade materials and longevity become paramount. 2.2. Durability Needs: Indoor vs. Outdoor, Temporary vs. Long-Lasting, Weather-Resistance. A sticker for an indoor laptop won't need the same robust protection as one exposed to sun, rain, and road grime. For truly outdoor-ready, waterproof bumper stickers, weather-resistance and UV protection are non-negotiable. Consider how long you want your sticker to last and under what conditions it will be displayed. This will guide your selection of laminates and printing materials. 2.3. Design Ideas: Brainstorming Themes, Messages, Visual Style. This is where your creativity truly comes alive! Think about what you want your custom bumper stickers to communicate. Will it be humorous, political, artistic, or informative? Sketch out some ideas, consider fonts, colors, and imagery. A strong initial design concept will streamline the entire process, ensuring your final product effectively conveys your message. Essential Materials & Tools for Homemade Bumper Stickers Having the right arsenal of materials and tools is key to successful DIY bumper stickers. Fortunately, most items are readily available, often found at your local craft store or online. 3.1. Design Software/Tools Your design journey starts here. Computer-based: For professional results, programs like Adobe Illustrator or Photoshop offer extensive control. However, user-friendly alternatives like Canva (which, as Royal Elements notes, is excellent for beginners) provide templates and easy-to-use interfaces. GIMP is a powerful free option for image manipulation. Hand-drawing: If you prefer a more artistic touch, good old-fashioned markers, pens, and paper can be used to create your design, which can then be scanned into your computer for printing. 3.2. Printing & Base Materials This is where your design comes to life on a physical surface. Printable Vinyl: This is the gold standard for durable, printable vinyl bumper stickers. You can find white, clear, matte, or glossy options specifically designed for inkjet or laser printers. Brands like Royal Elements are popular choices among DIY enthusiasts. Regular Paper: For a super budget-friendly alternative, as seen in Instructables' "Nebsi Method," standard printer paper can be used, though it will require significant protection later. 3.3. Protection & Lamination Crucial for transforming printed designs into resilient homemade bumper stickers. Self-adhesive Laminating Sheets: These are often the key to waterproofing and UV protection, particularly highlighted in both Instructables' and Royal Elements' methods. They come in various finishes (glossy, matte) and sizes. Clear spray sealant (alternative): While not as robust as laminating sheets, a clear acrylic spray can offer some protection against moisture and UV rays. 3.4. Cutting Tools To give your stickers their final shape. Scissors or craft knife: For simple shapes or when you're just starting out, a good pair of sharp scissors or a craft knife with a cutting mat will do the trick. Cutting machine (Cricut, Silhouette): For precision, intricate designs, or if you plan to make many stickers, a cutting machine like a Cricut or Silhouette is an invaluable investment. 3.5. Application Aids For a smooth, professional finish. Squeegee: Helps press out air bubbles during application. Rubbing alcohol: Essential for thoroughly cleaning the surface of your vehicle before applying the sticker, ensuring maximum adhesion. 4. Method 1: The Popular Printable Vinyl Bumper Sticker Guide This method, often employed by experienced DIYers and detailed in resources like Royal Elements and wikiHow, is considered the benchmark for creating high-quality, durable custom bumper stickers at home. Method 1: The Popular Printable Vinyl Bumper Sticker Guide Method 1: The Popular Printable Vinyl Bumper Sticker Guide 4.1. Step 1: Design Your Masterpiece. Start by creating your artwork in your chosen design software. Focus on high-resolution graphics to ensure crisp lines and vibrant colors. Pay attention to the correct dimensions for your desired sticker size. If you’re incorporating text, ensure it’s legible even from a distance, choosing bold fonts and contrasting colors. MerchFox often advises using a CMYK color profile if your printer supports it, as it’s better for print accuracy than RGB. 4.2. Step 2: Print Your Design on Vinyl. Load your printable vinyl into your home printer (inkjet or laser, depending on your vinyl type). It's crucial to select the correct printer settings – typically "photo quality" or "glossy paper" – to ensure the ink adheres properly and colors are vibrant. Print a test sheet on regular paper first to check colors and layout. Once printed on vinyl, allow ample time for the ink to dry completely, usually several hours, to prevent smudging. 4.3. Step 3: Laminate for Ultimate Protection (Crucial for Durability). This is perhaps the most critical step for outdoor waterproof bumper stickers. Laminating protects your sticker from UV fading, water damage, and scratches. Carefully peel back a small corner of your self-adhesive laminating sheet and align it with your printed vinyl. Slowly and steadily press the laminate down, using a squeegee or even a credit card to smooth it out and push any air bubbles towards the edges. Take your time here – a smooth lamination is key to longevity. 4.4. Step 4: Cut Out Your Bumper Sticker. With your design now printed and protected, it’s time to cut it out. For simple shapes, sharp scissors or a craft knife can achieve a clean edge. If you’re using a cutting machine like a Cricut or Silhouette, follow your machine’s instructions for calibrating and cutting, which allows for incredibly precise and complex shapes. 4.5. Step 5: Prepare and Apply Your Sticker. Proper application ensures your sticker stays put. First, thoroughly clean the application surface on your vehicle with rubbing alcohol and let it dry completely. This removes any wax, dirt, or grease that could prevent adhesion. Slowly peel the backing off your bumper sticker. Position it carefully, then apply it from one side to the other, using a squeegee to press it down firmly and work out any remaining air bubbles. For best results, MerchFox recommends applying in moderate temperatures, avoiding extreme heat or cold. 5. Method 2: The Budget-Friendly "Nebsi Production Method" (Laminate & Paper) For those looking for a cost-effective alternative or a more temporary solution, the "Nebsi Production Method," popularized on Instructables, is an ingenious way to create homemade bumper stickers using regular paper and laminating sheets. Method 2: The Budget-Friendly "Nebsi Production Method" (Laminate & Paper) Method 2: The Budget-Friendly "Nebsi Production Method" (Laminate & Paper) 5.1. Understanding the "Nebsi Method": This method cleverly uses the laminating sheet not just for protection but also to create a repositionable, adhesive layer. By laminating both the front and back of a regular paper print, you encapsulate the design and create a surface that can be adhered to a car and even repositioned with care. It's a fantastic entry point for how to make your own bumper stickers without investing in specialized vinyl. 5.2. Step 1: Design & Print on Regular Paper. Create your design as usual, but this time, print it onto high-quality regular printer paper. While regular paper won't offer the inherent durability of vinyl, focusing on the best possible print resolution will ensure your colors are vibrant and details are crisp. 5.3. Step 2: Apply Laminate to the Front. Carefully apply a self-adhesive laminating sheet to the front (design side) of your printed paper. This layer protects your design from moisture and wear, giving it a glossy or matte finish depending on your laminate choice. Ensure a smooth, bubble-free application, as this is the primary protective layer. 5.4. Step 3: Apply Laminate to the Back. This is the unique step for the "Nebsi Method." Apply a second laminating sheet to the back of your paper. This second layer, once trimmed with a slight border, creates a temporary, repositionable adhesive surface. When you’re ready to apply, you simply peel off a portion of the backing paper from this laminate. 5.5. Step 4: Trim and Finish. Once both sides are laminated, trim your sticker to the desired shape, leaving a small border of laminate around the design. This border helps seal the paper edges, further protecting it from moisture. 5.6. Benefits & Best Use Cases: The Nebsi Method is incredibly cost-effective, yields a nice glossy finish (if using glossy laminate), and offers easy repositioning, making it ideal for temporary messages or if you frequently change your mind. While not as durable as pure vinyl in extreme conditions, it’s a brilliant way to experiment with custom bumper stickers on a budget. 6. Method 3: Quick & Artistic Hand-Drawn Bumper Stickers For those who love a truly unique, artisanal touch, hand-drawn bumper stickers offer unparalleled originality. This method emphasizes creativity and individual flair over mass production. Method 3: Quick & Artistic Hand-Drawn Bumper Stickers Method 3: Quick & Artistic Hand-Drawn Bumper Stickers 6.1. Materials: You'll need sturdy cardstock or heavy paper, waterproof markers or paints (like acrylics), and clear contact paper or a spray sealant for protection. 6.2. Process: First, draw or paint your design directly onto the cardstock. Once completely dry, apply clear contact paper smoothly over the entire design for basic waterproofing, or use several coats of a clear spray sealant. After the sealant dries, cut out your design. To apply, you can use double-sided outdoor adhesive tape or magnets for a removable option. 6.3. Best for: This method is perfect for truly unique, artistic, one-off designs or protest signs where the raw, handmade aesthetic adds to the message. While less durable than printed vinyl methods, the authenticity is undeniable. 7. Maximizing Durability and Longevity: Pro Tips for Your Bumper Stickers Creating homemade bumper stickers that last requires attention to detail, especially when aiming for outdoor durability. Maximizing Durability and Longevity: Pro Tips for Your Bumper Stickers Maximizing Durability and Longevity: Pro Tips for Your Bumper Stickers 7.1. The Importance of Quality Lamination: As MerchFox often stresses, lamination is your first line of defense. A high-quality laminating sheet provides critical UV resistance (preventing fading), waterproofing (protecting against rain and washes), and scratch protection (guarding against minor abrasions). Don't skimp on this step for outdoor stickers. 7.2. Material Selection: Choosing weather-resistant printable vinyl, designed specifically for outdoor use, provides a superior base. These materials are formulated to withstand environmental stressors better than standard paper or indoor vinyls. 7.3. Proper Surface Preparation: The longevity of your sticker is directly tied to its adhesion. Always clean the application surface thoroughly with rubbing alcohol to remove any contaminants. A clean, dry surface ensures maximum stick and prevents premature peeling. 7.4. Handling & Storage: Before application, store your stickers flat in a cool, dry place away from direct sunlight. Improper handling, like bending or creasing, can compromise the adhesive or lamination, leading to issues later on. 8. From Hobby to Business: How to Make Bumper Stickers to Sell Turning your passion for custom bumper stickers into a profitable venture is entirely achievable. Many successful businesses started in a home workshop, as resources like wikiHow and Swagify highlight. From Hobby to Business: How to Make Bumper Stickers to Sell From Hobby to Business: How to Make Bumper Stickers to Sell 8.1. Market Research: Identify trends, popular niches, and target audiences. What messages resonate? What visual styles are currently popular? Research what's selling well on platforms like Etsy or local craft markets. 8.2. Designing for Profit: To create marketable designs, focus on uniqueness, high-quality aesthetics, and broad appeal within your chosen niche. Think about witty phrases, compelling graphics, or designs that speak to specific interests. 8.3. Material & Production Costs: Accurately calculate all your expenses, including printable vinyl, laminating sheets, ink, cutting blades, and even packaging. Understanding these costs is crucial for setting profitable prices. For bulk production, a cutting machine becomes highly cost-effective. 8.4. Pricing Your Bumper Stickers: Consider your production costs, the perceived value of your design, and competitor pricing. Aim for a price that covers your expenses, provides a reasonable profit, and remains attractive to buyers. 8.5. Marketing & Sales Channels: Etsy, Shopify, and other e-commerce platforms are excellent for online sales. Don't overlook local markets, craft fairs, or even collaborating with local businesses. Social media, particularly Instagram and TikTok, are powerful tools for showcasing your designs and reaching potential customers. 8.6. Packaging & Shipping: Presenting a professional product enhances perceived value. Use sturdy envelopes or mailers, and consider adding a small branded insert. Research cost-effective and reliable shipping methods for your DIY bumper stickers. 9. Troubleshooting Common Bumper Sticker Issues Even with the best planning, sometimes things don't go perfectly. Knowing how to troubleshoot common problems can save your project. Troubleshooting Common Bumper Sticker Issues Fading colors or cracking: This usually indicates insufficient UV protection. Ensure you're using quality laminating sheets with UV inhibitors, or a clear spray sealant specifically designed for outdoor use. Bubbles or peeling during application: Often caused by improper surface cleaning or rushed application. Clean thoroughly, apply slowly with a squeegee from the center outwards, and work in moderate temperatures. Difficulty removing old stickers cleanly: For stubborn stickers, heat (from a hairdryer on a low setting) can soften the adhesive. Plastic scrapers and adhesive removers (like Goo Gone) can help with residue, but always test on an inconspicuous area first. Ink smudging or bleeding during printing: This is typically due to incorrect printer settings (e.g., wrong paper type selected) or not allowing enough drying time before handling or laminating. Ensure your printer settings match your vinyl type and be patient with drying. 10. Frequently Asked Questions (FAQs) About DIY Bumper Stickers Frequently Asked Questions (FAQs) About DIY Bumper Stickers Q: How long do homemade bumper stickers typically last? A: The lifespan of homemade bumper stickers varies greatly depending on the method and materials used. High-quality printable vinyl with robust lamination can last 3-5 years outdoors. Budget-friendly paper methods might last a few months to a year, especially if exposed to harsh weather. Q: Can I use a regular home printer (inkjet/laser)? A: Yes, absolutely! Both inkjet and laser printers can be used to print bumper stickers at home, provided you choose printable vinyl or paper specifically designed for your printer type. Always check the product description of your chosen material. Q: Are all homemade bumper stickers waterproof? A: No, not inherently. To make waterproof bumper stickers, you must laminate them with self-adhesive sheets or use a waterproof clear spray sealant. The printable vinyl itself might be water-resistant, but the ink and paper (if used) need protection. Q: What's the best way to remove an old bumper sticker without damaging my car? A: The safest method involves using heat (a hairdryer on low) to soften the adhesive, then gently peeling the sticker off. For stubborn residue, automotive adhesive removers or rubbing alcohol can be used, but always test on a hidden area first. Q: Can I make transparent bumper stickers at home? A: Yes, you can! You'll need to purchase transparent or clear printable vinyl. The process is similar to white vinyl, but your design will need to account for the transparency of the background. Remember that light colors and whites won't show up well on a transparent sticker without a white underlayer. 11. Conclusion: Your Road to Custom Bumper Sticker Success Starts Now! Conclusion: Your Road to Custom Bumper Sticker Success Starts Now! There you have it – a comprehensive guide to mastering how to make your own bumper stickers. From selecting your purpose and gathering materials to printing, laminating, and even selling your creations, the journey is both creative and rewarding. Whether you're aiming for personal expression, thoughtful gifts, or a new entrepreneurial venture, the tools and knowledge are now at your fingertips. Don't be afraid to experiment with different designs, colors, and methods. Each attempt refines your skills and brings you closer to crafting that perfect sticker. As we at MerchFox have seen, the satisfaction of seeing your own custom bumper stickers on a car, a laptop, or even a water bottle is unmatched. So go ahead, unleash your creativity, and let your message hit the road!

Have you ever designed something beautiful on your computer, only to have it come back from the printer looking completely different? It's a common, frustrating experience for many designers and businesses. The vibrant blues become dull purples, and bright greens turn muddy. This isn't a printer conspiracy; it's a fundamental misunderstanding of how colors translate between the digital and physical worlds. As MerchFox often shares from their extensive experience, this color discrepancy is almost always due to the difference between RGB and CMYK color systems.

Read article