

The MerchFox Design Editor provides an intuitive canvas workspace that allows you to preview graphics on various garment areas, test color combinations, and inspect fine artwork details before saving. This guide covers canvas controls, multi-position print selection, and garment background toggles.
Workspace Layout Overview
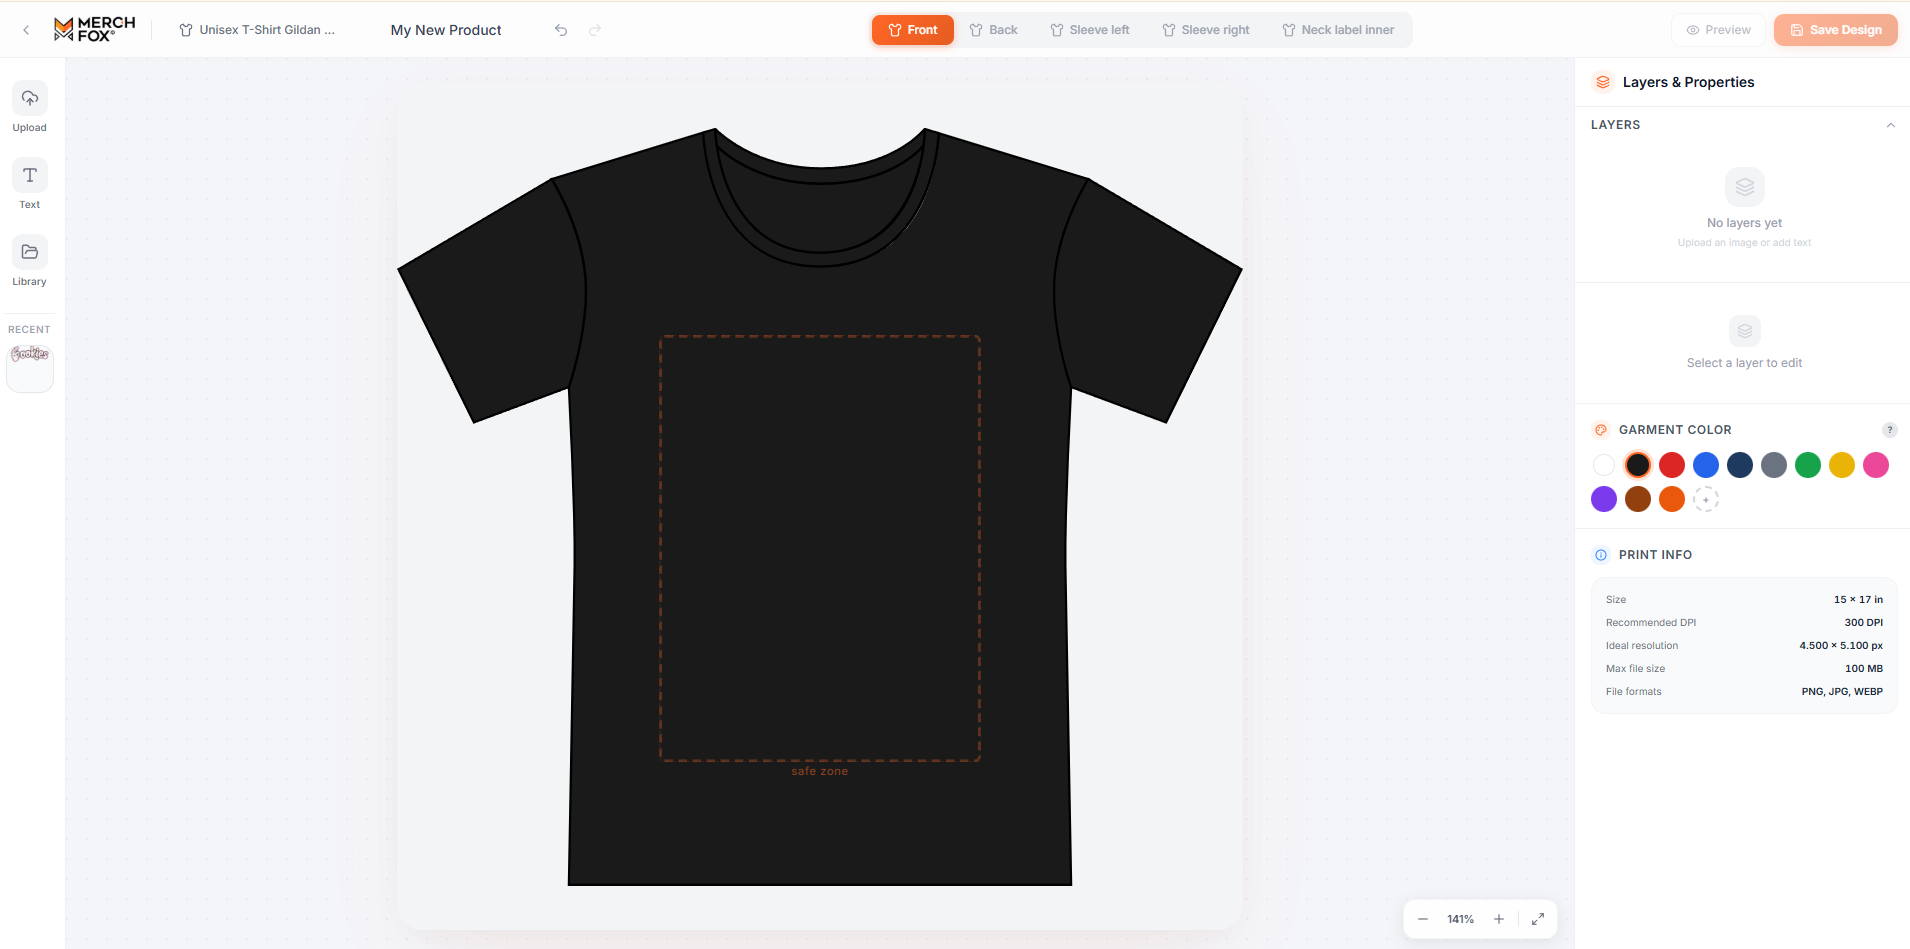
When you open a product blank in the Design Editor, the interface is split into three core functional areas:
Left Sidebar (Asset Controls): Tools to upload images, add custom text elements, or import existing graphics from your Design Library.
Center Canvas (Interactive Preview): The main visual workspace displaying the target garment, active safe zone bounds, and real-time element transformations.
Right Panel (Layers, Properties & Print Info): Dynamic inspector for precision layout parameters, layer stacking order, alignment shortcuts, color selection, and print specifications.
Step 1: Navigating the Canvas View (Zoom & Pan)
To inspect intricate design details or view the full garment silhouette, use the floating zoom bar located at the bottom-right corner of the canvas:
Zoom In (
+) / Zoom Out (-): Click the plus or minus buttons (or use your mouse scroll wheel) to scale the canvas magnification level (e.g., from100%up to200%+).Fit to Screen: Click the expand icon
[ ]next to the percentage indicator to automatically fit the active print area within your browser window.
Step 2: Multi-Position Print Selection
Most apparel items support printing on multiple locations. Use the top navigation bar centered above the canvas to switch between available print positions:
Front: Primary full-chest or left-chest placement.
Back: Rear artwork placement.
Sleeve Left: Outer left sleeve graphic or logo placement.
Sleeve Right: Outer right sleeve graphic or logo placement.
Neck Label Inner: Custom inner neck branding/size label placement.
Note: Each print position has its own independent canvas and safe zone area. Selecting a new position allows you to upload or apply distinct design layers specific to that location.
Step 3: Changing Garment Background Colors
To verify how your artwork contrast looks across different blank colorways:
Locate the GARMENT COLOR section in the right sidebar panel.
Click on any color swatch circle (e.g., White, Black, Red, Royal Blue, Navy, Dark Heather, Green, Gold, Pink, Purple, Brown, Orange).
The mock backdrop in the main canvas will instantly reflect the chosen color.
Contrast Inspection: Switching background colors helps ensure that semi-transparent gradients or dark text lines remain legible across light and dark fabric options.
Multi-Color Offerings: Changing the garment preview color does not lock your final product to a single color—it simply helps you verify design suitability for multi-color store listings.
Step 4: Viewing Print Specs & Recommendations
In the lower right panel under PRINT INFO, you can view real-time technical parameters specific to the active print area and selected blank model:
Size: Physical dimensions of the print surface (e.g.,
15 × 17 in).Recommended DPI: Minimum resolution benchmark (300 DPI).
Ideal Resolution: Pixel dimensions for standard 1:1 coverage (e.g.,
4,500 × 5,100 px).Max File Size & Formats: Accepted upload parameters (
100 MB,PNG,JPG,WEBP).
Frequently Asked Questions
Can I print on all positions (Front, Back, Sleeves, Neck Label) at the same time?
Yes. You can add designs to multiple positions on a single garment. Keep in mind that additional print positions incur incremental base fulfillment costs from the print provider.
Does changing the garment color on canvas affect my uploaded artwork colors?
No. Changing the garment color only modifies the mock canvas backdrop. Your uploaded artwork file retains its exact native colors.
Was this article helpful?
Let us know so we can continue improving our help center.